


-
Welcome to rpgcodex.net, a site dedicated to discussing computer based role-playing games in a free and open fashion. We're less strict than other forums, but please refer to the rules.
"This message is awaiting moderator approval": All new users must pass through our moderation queue before they will be able to post normally. Until your account has "passed" your posts will only be visible to yourself (and moderators) until they are approved. Give us a week to get around to approving / deleting / ignoring your mundane opinion on crap before hassling us about it. Once you have passed the moderation period (think of it as a test), you will be able to post normally, just like all the other retards.
You are using an out of date browser. It may not display this or other websites correctly.
You should upgrade or use an alternative browser.
You should upgrade or use an alternative browser.
Let's Play Fall Gelb (Allied #6 - To the Dyle!)
- Thread starter zool
- Start date
zool
Arcane
- Joined
- Oct 26, 2009
- Messages
- 897
Turn 2 (Axis) - The fog starts to lift
On his second turn, my opponent has proceeded to a series of predictable moves, but I've also spotted some of his Pz-Div at places where I didn't expect them to be - and I'm not sure what he intends to do with them.
 : Peuh! The Hun cannot fool me, I am too smart.
 : Well, all I know is that I'm getting pounded... errr I mean my armed forces are!
 : I think they might be trying to stage an attack from the sea near Brugge.
 : Oh God...
 : :trollface:
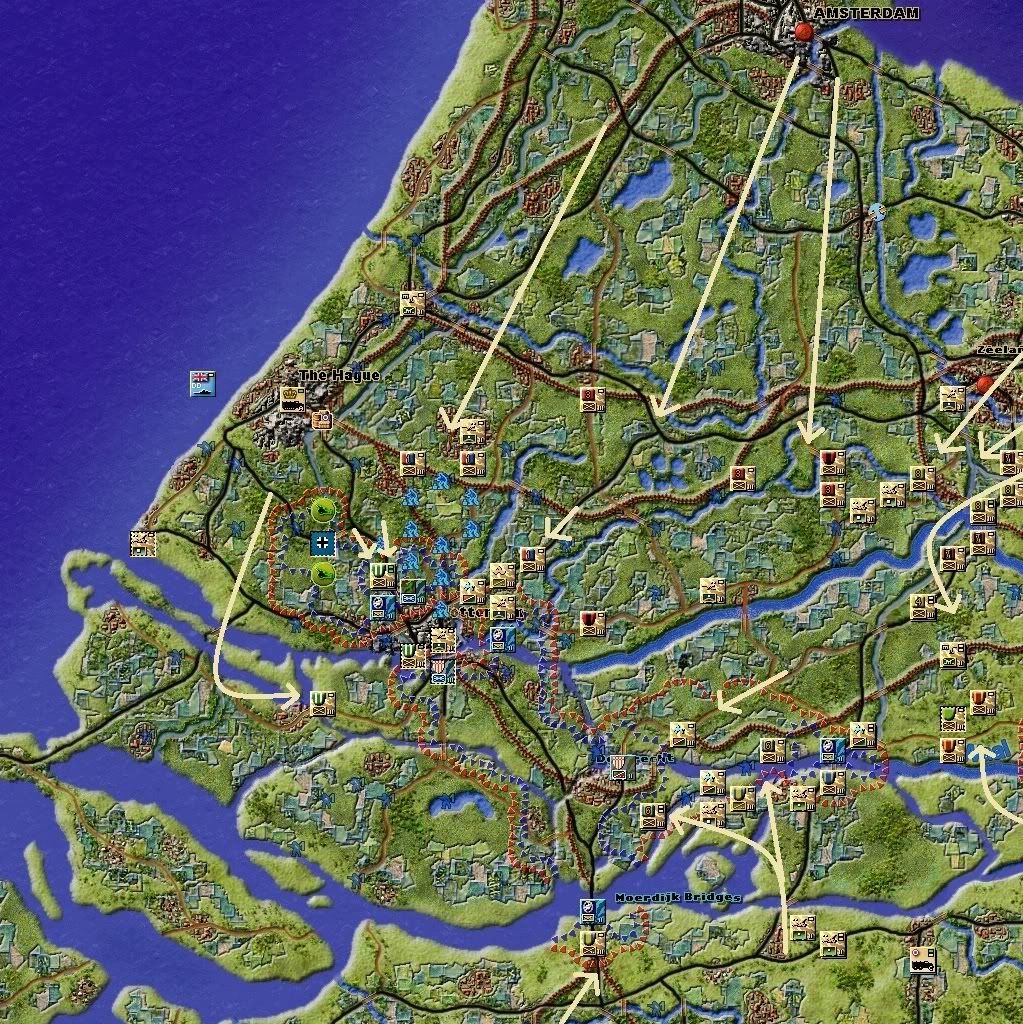
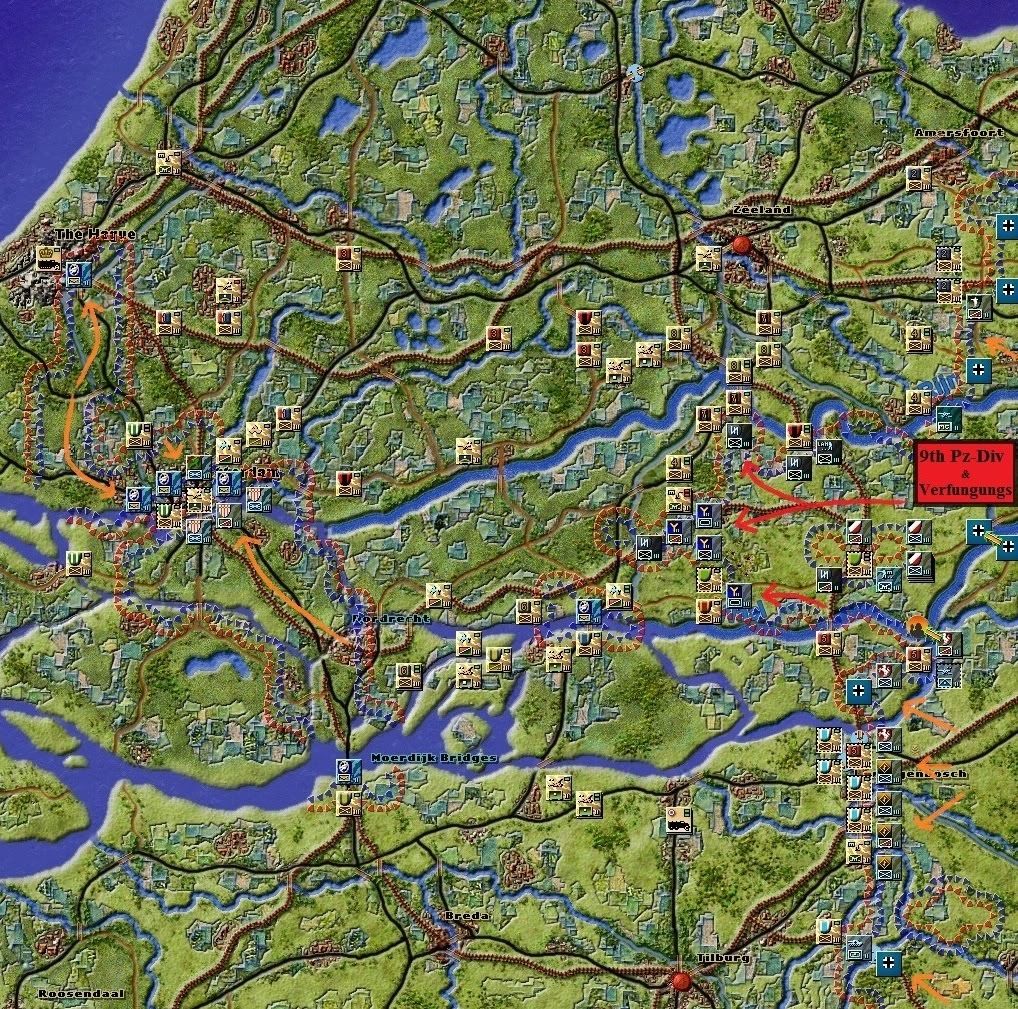
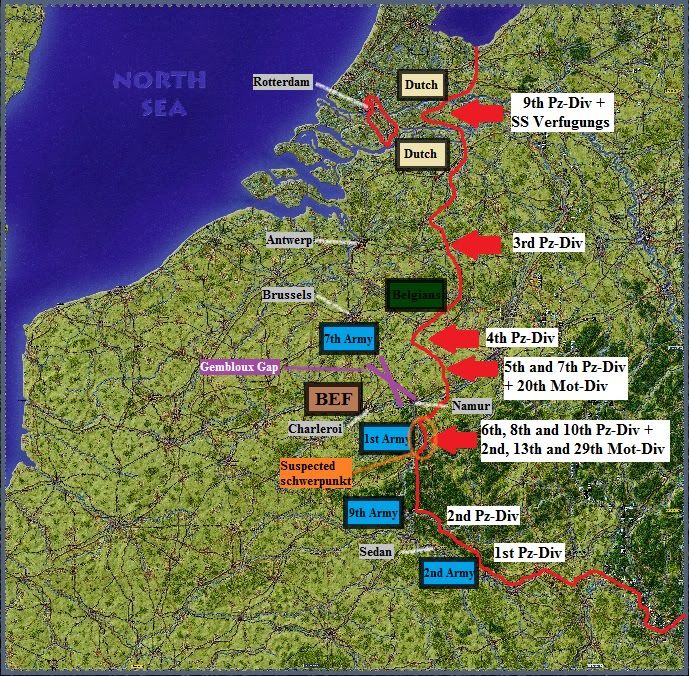
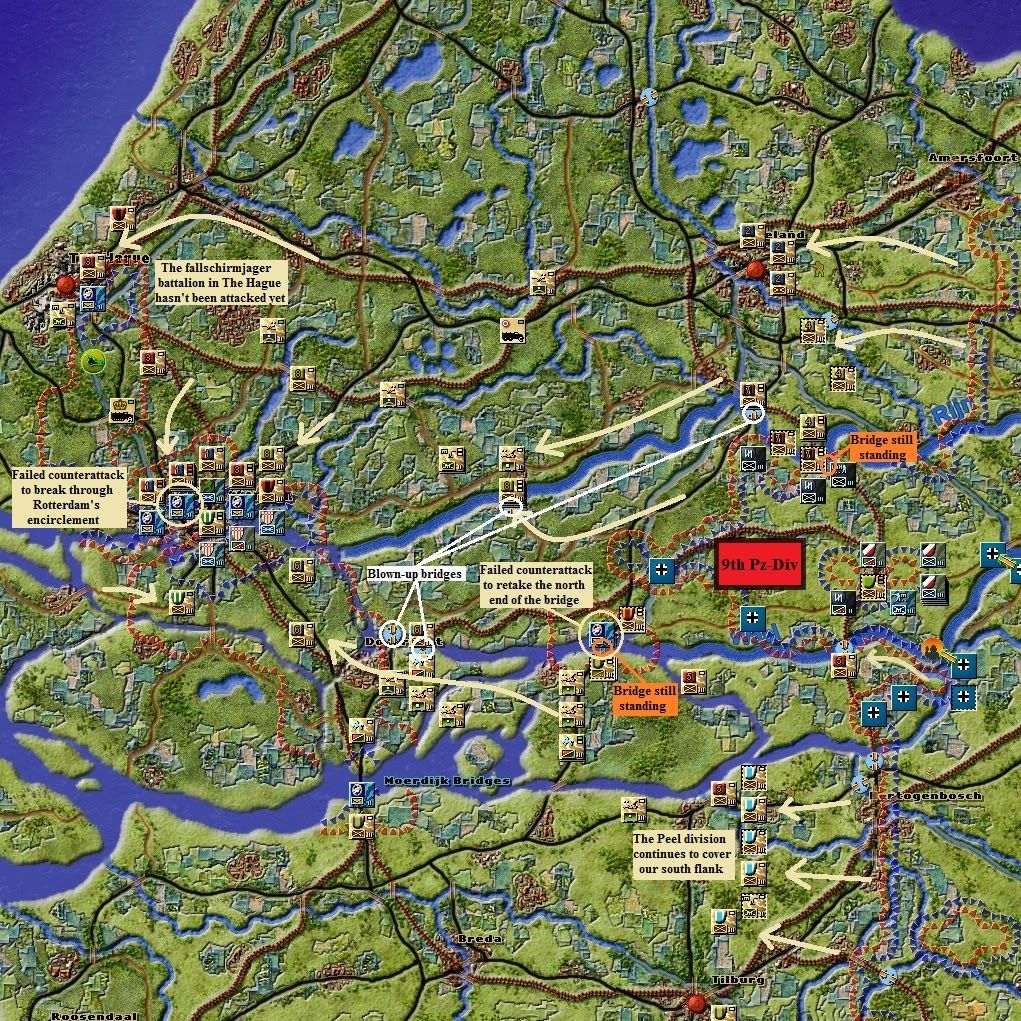
Holland: breakthrough in the Waal-Rhine corridor
The German fallschirmjager northwest and south of Rotterdam have received reinforcements. They've moved toward the city, with the clear goal of surrounding it in order to prevent the weak Dutch regiment there from getting any outside support. Meanwhile, a fallschirmjager battalion has pushed east from Dordrecht to reach out to the incoming 9th Pz-Div (see next pic)
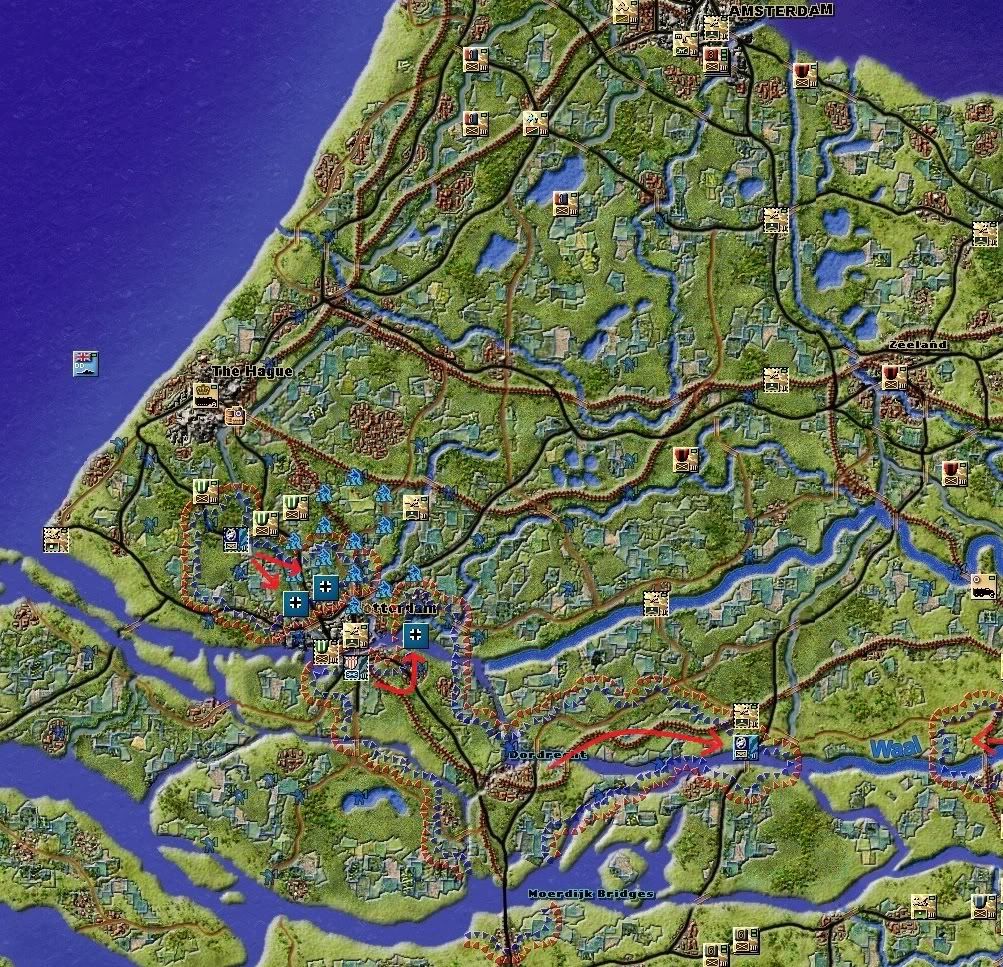
As expected, the Germans have completely ignored the main northern Dutch line of defense between the Rhine and the Zuiderzee. Instead, the SS Verfugungs Mot-Div has pushed west in the Rhine-Waal corridor, obliterating the regiment I had left there. My opponent showed his wile with the 9th Pz-Div: expecting a tough resistance on the southern road through Hertogenbosch, he instead used a pontoon unit to cross the Waal. With their forces combined, the two elite German divisions are going to be very hard to stop - espcially considering that the terrain between the Waal and the Rhine is mostly plains.
Note: no regiments of the Verfugungs and 9th Pz-Div are visible on this screenshot simply because they're not near any of my units - but I've seen them operate while watching my opponent's turn.
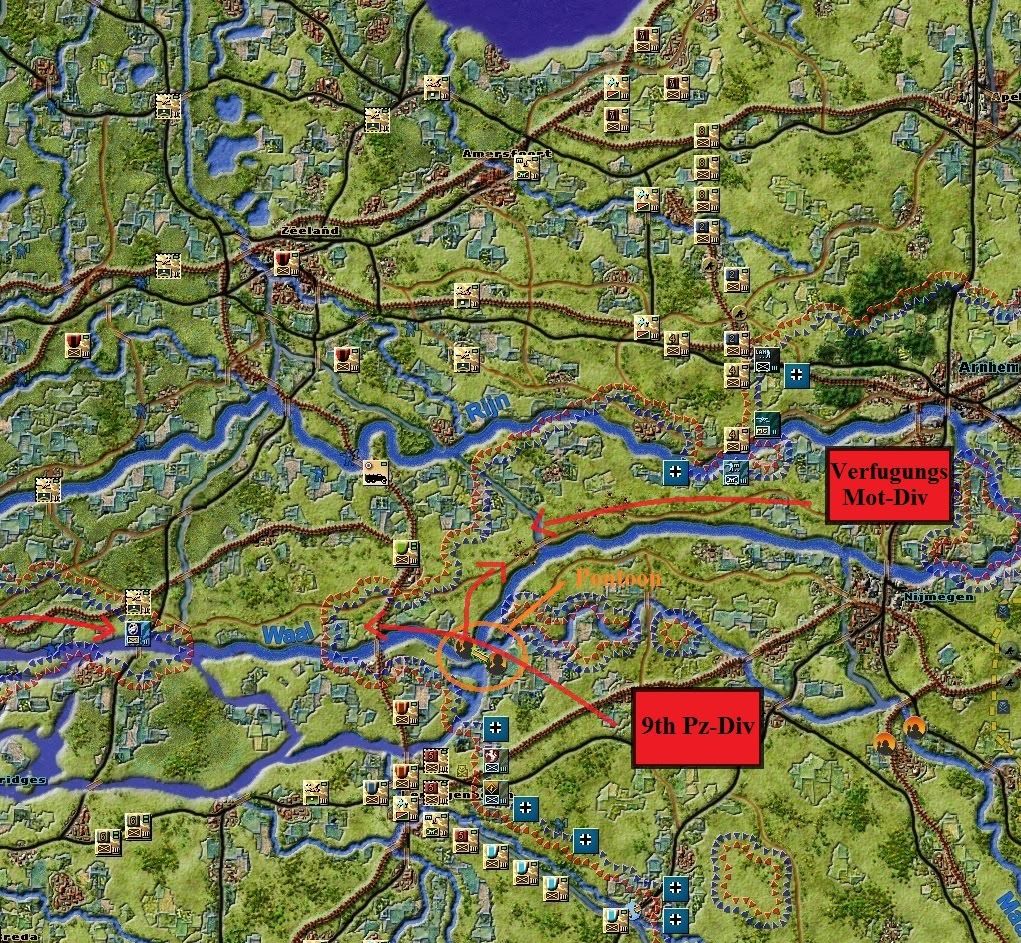
In the southern part of Holland, I have had one big surprise: while watching my opponent's turn unravel, I spotted the 3rd Pz-Div near Eindhoven. The 3rd Pz-Div is one of the two Pz-Div of the 6th Army: usually, the German player chooses to use both of them in the plains southwest of Maastricht. But here, it seems that my opponent has decided to use it further north - though for what goal I do not know. This area doesn't have much strategic value: maybe he is going to try a raid on Antwerp by going down the road southwest through Turnhout.
During the assault on Eindhoven, my opponent used heavy artillery to assist in destroying my unit entrenched in the city, and it left a lot of cratering in the hex and adjacent hexes (=will cause movement penalty for both sides on those hexes in the next two turns ).
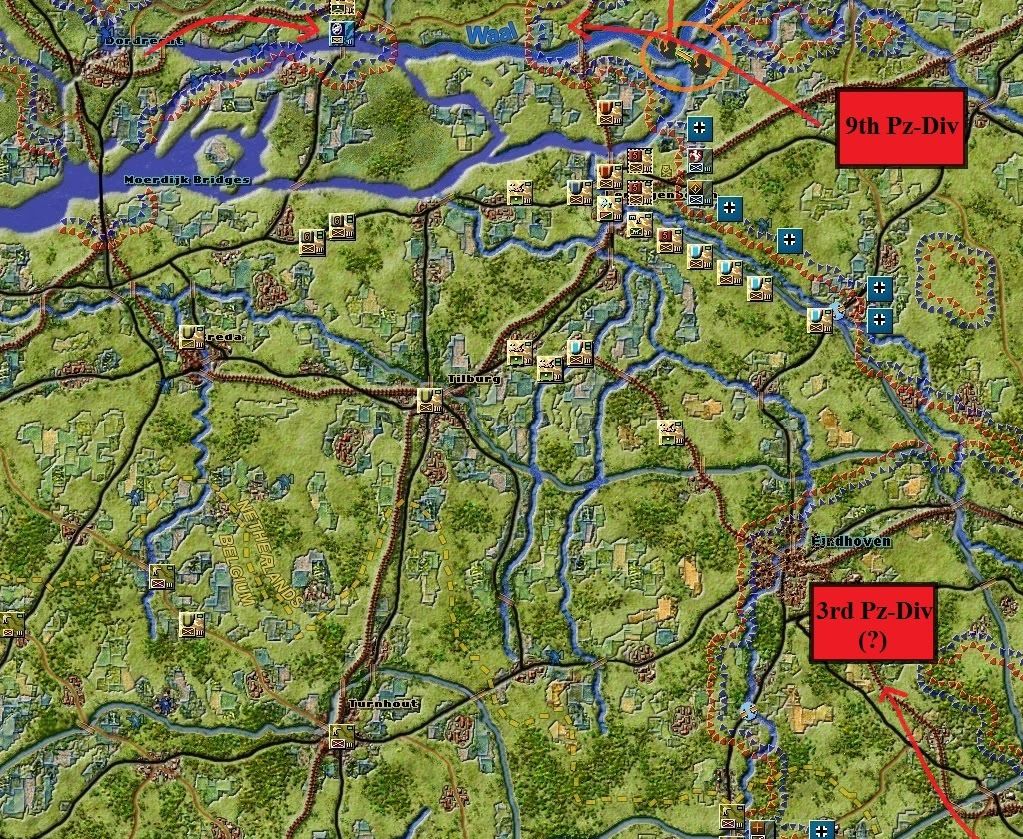
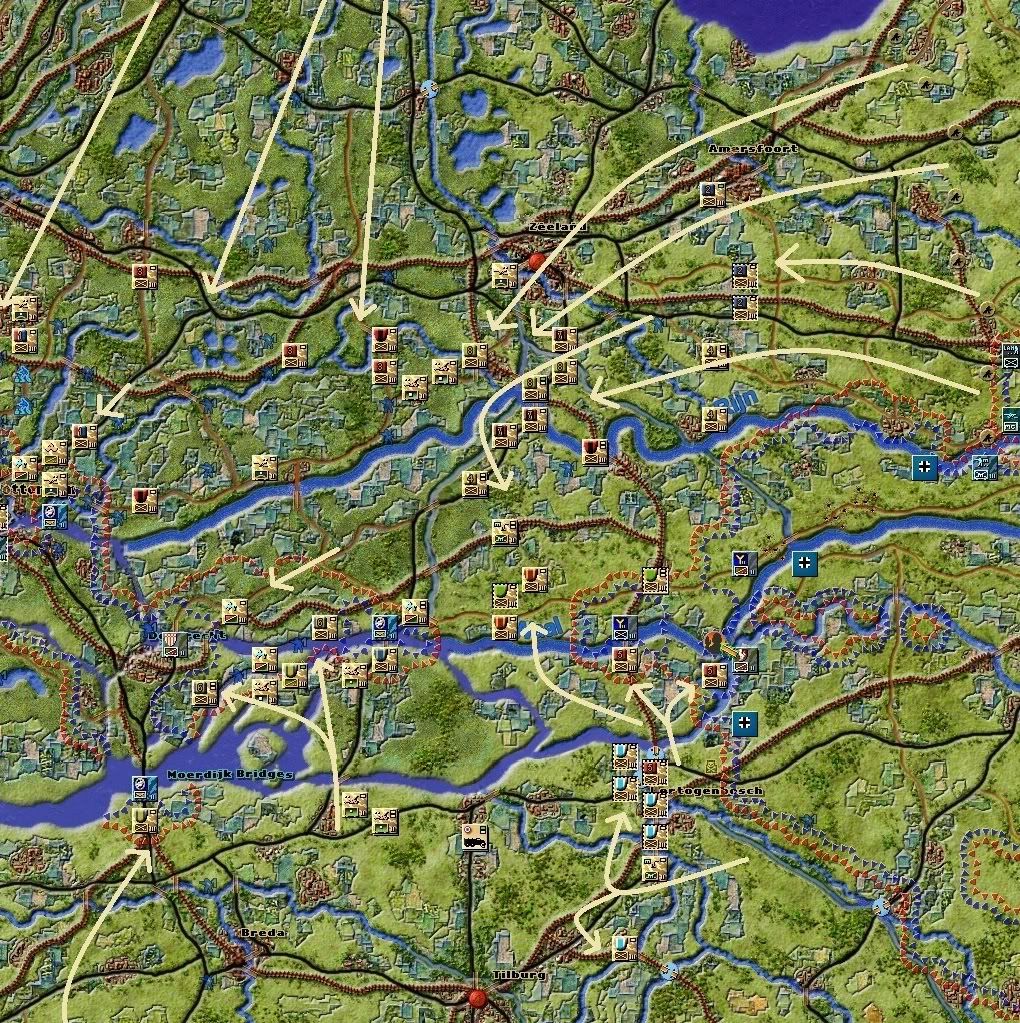
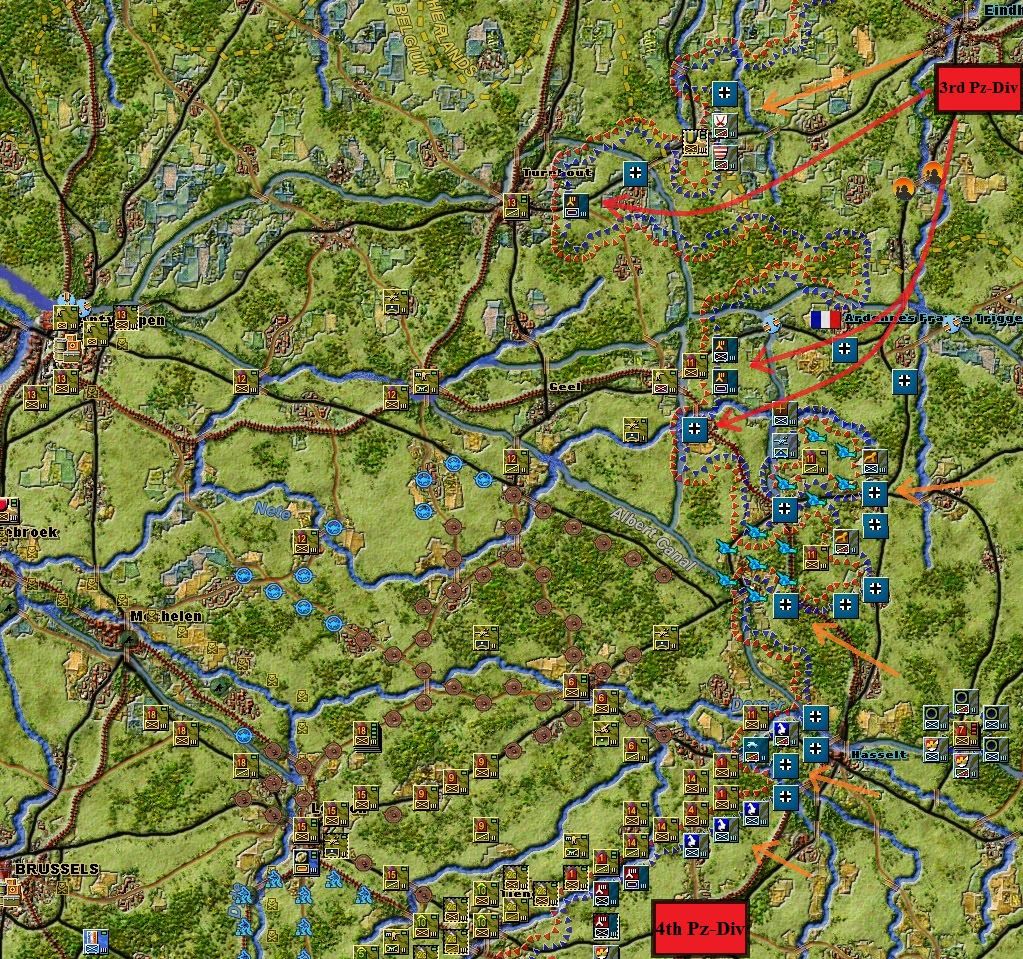
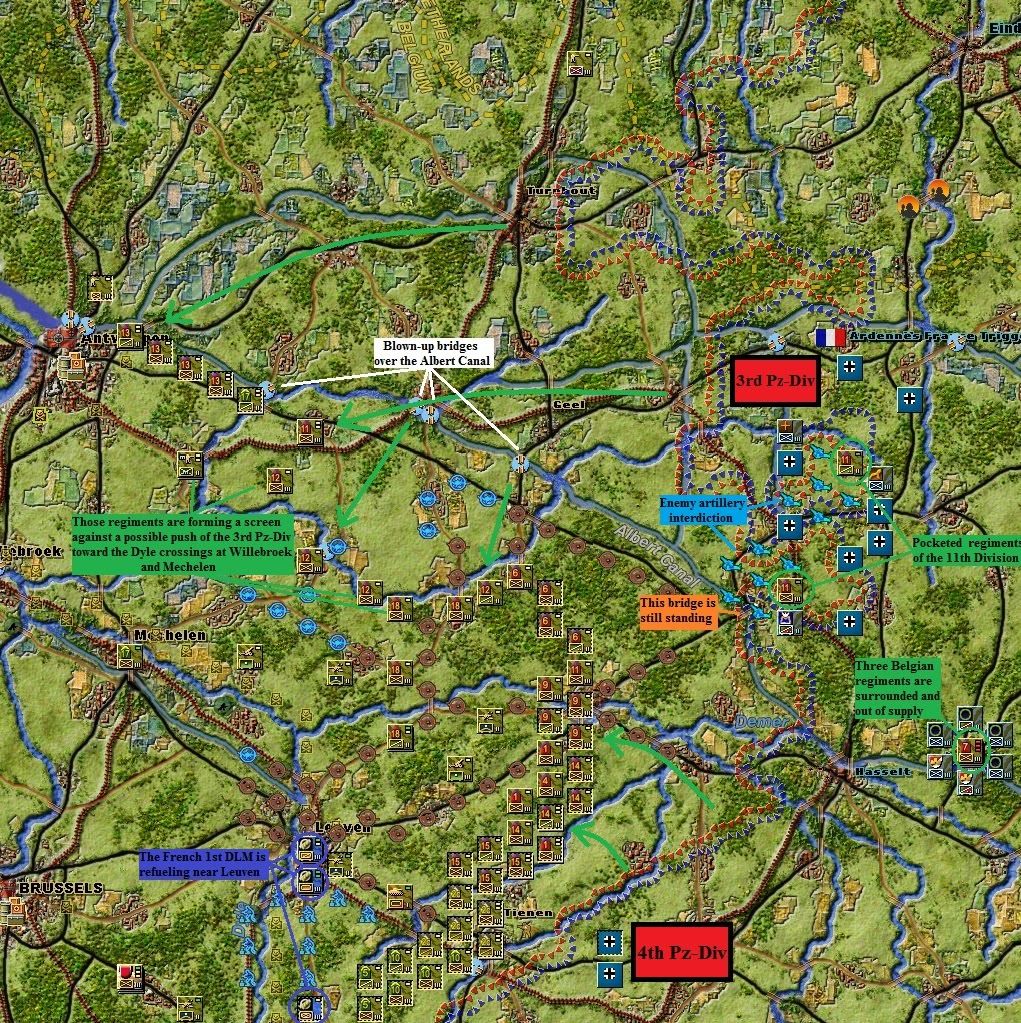
Belgium: outpaced
As expected, the region north of the Albert Canal is neglected by the Axis player. The 3rd Pz-Div has gone to Eindhoven, and enemy presence here is limited to a few infantry divisions advancing west and trying to pocket Belgian stragglers.
Orange arrows are for secondary infantry movements, while red arrows show armored and motorized units movement.
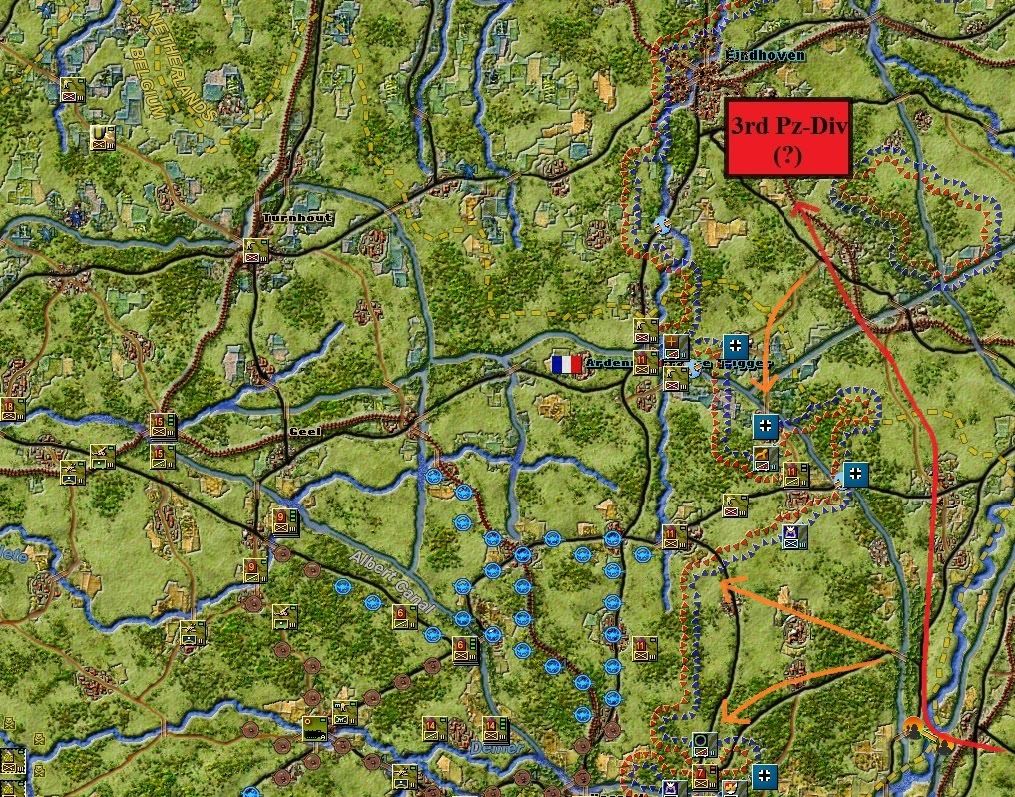
Following its breakthrough at Maastricht, the 6th Army is now advancing at full speed in the plains. Whilst German infantry keeps pressuring the 1st and 4th Belgian divisions at Hasselt, the 4th Pz-Div has easily disposed of the meager units we had left in the plains to slow it down. It pushed resolutely west toward the Dyle and its point units reached the town of Tienen: obviously, my opponent is hoping to pocket the Belgian units still defending the Albert canal to the north.
The 20th Mot-Div has cut the only way of retreat of the Belgian 3rd division retreating from Liege. Combined with the 5th and 7th Pz-Div arriving from the south bank of the Meuse, this is a textbook pincer movement maneuver. The French 1st DCR in Namur is too far way - and the area to heavily interdicted - to be of any help.
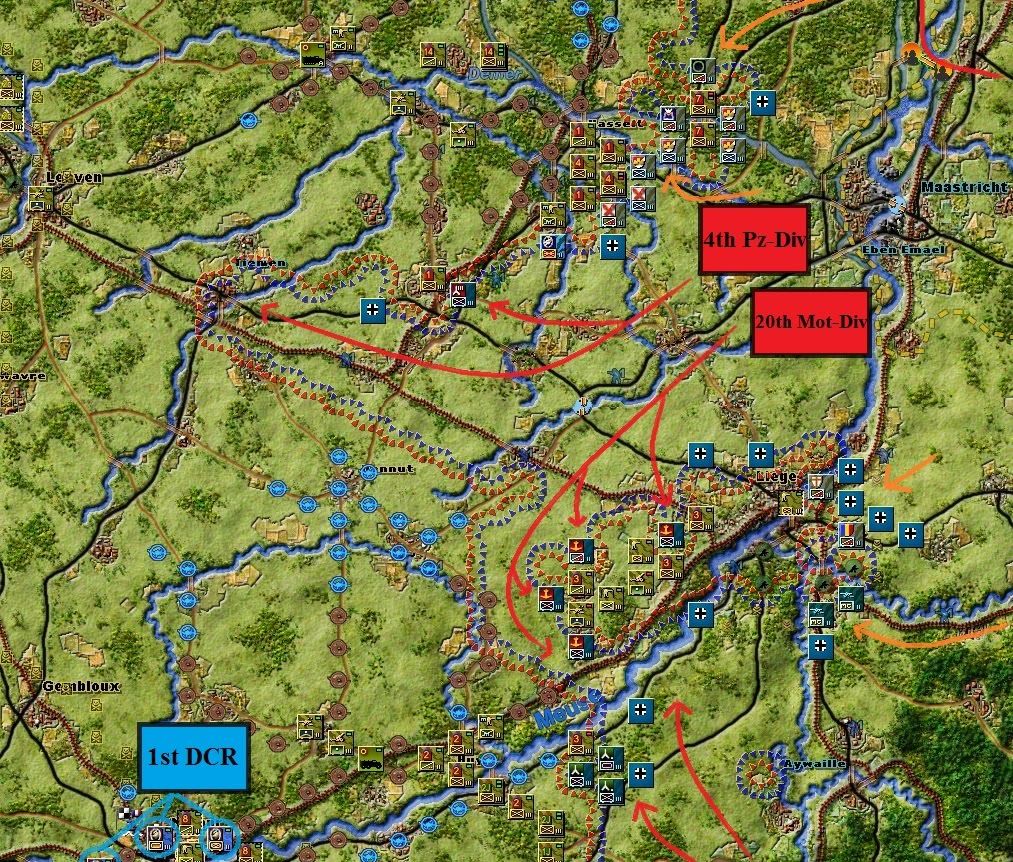
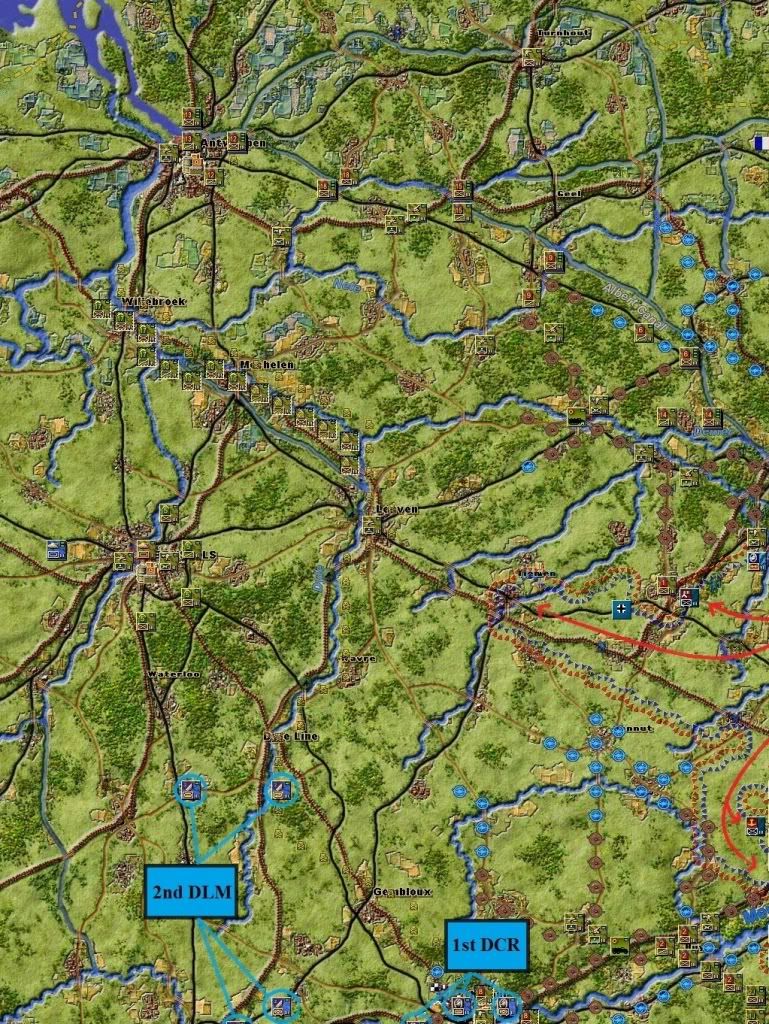
And here is a zoomed-out view of the rest of the Belgian forces. Those divisions entrenched behind the Dyle at Willebroek and Mechelen will prove useful when I play my turn.
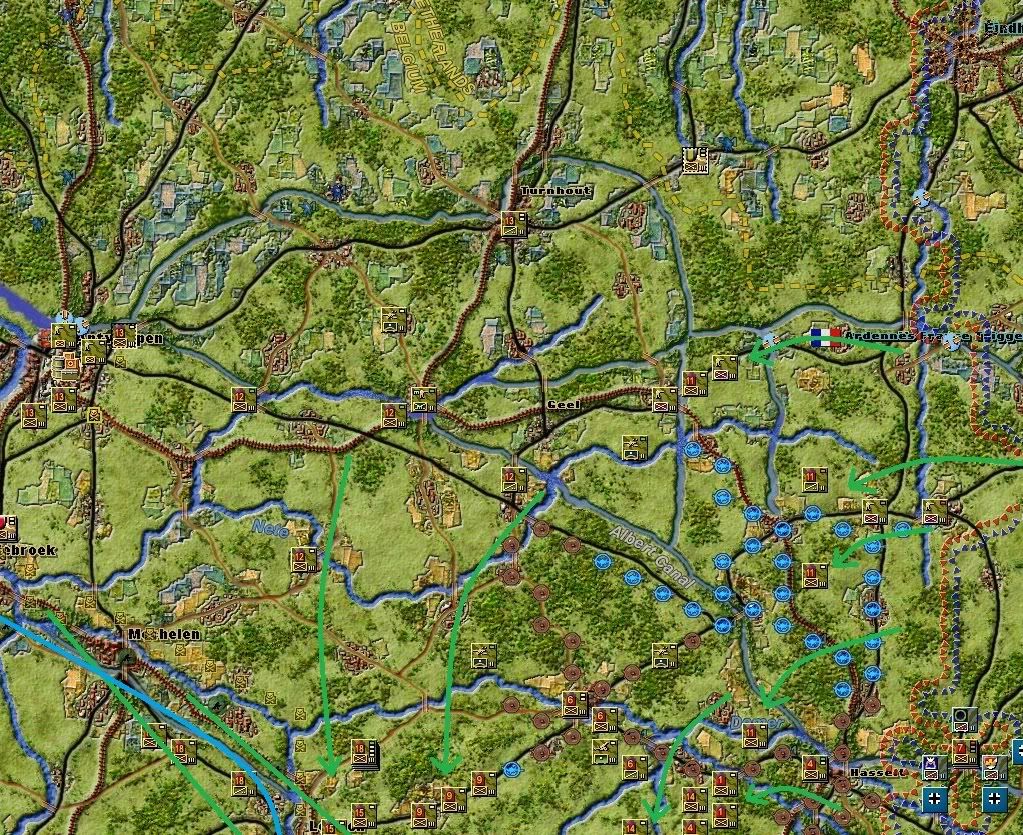
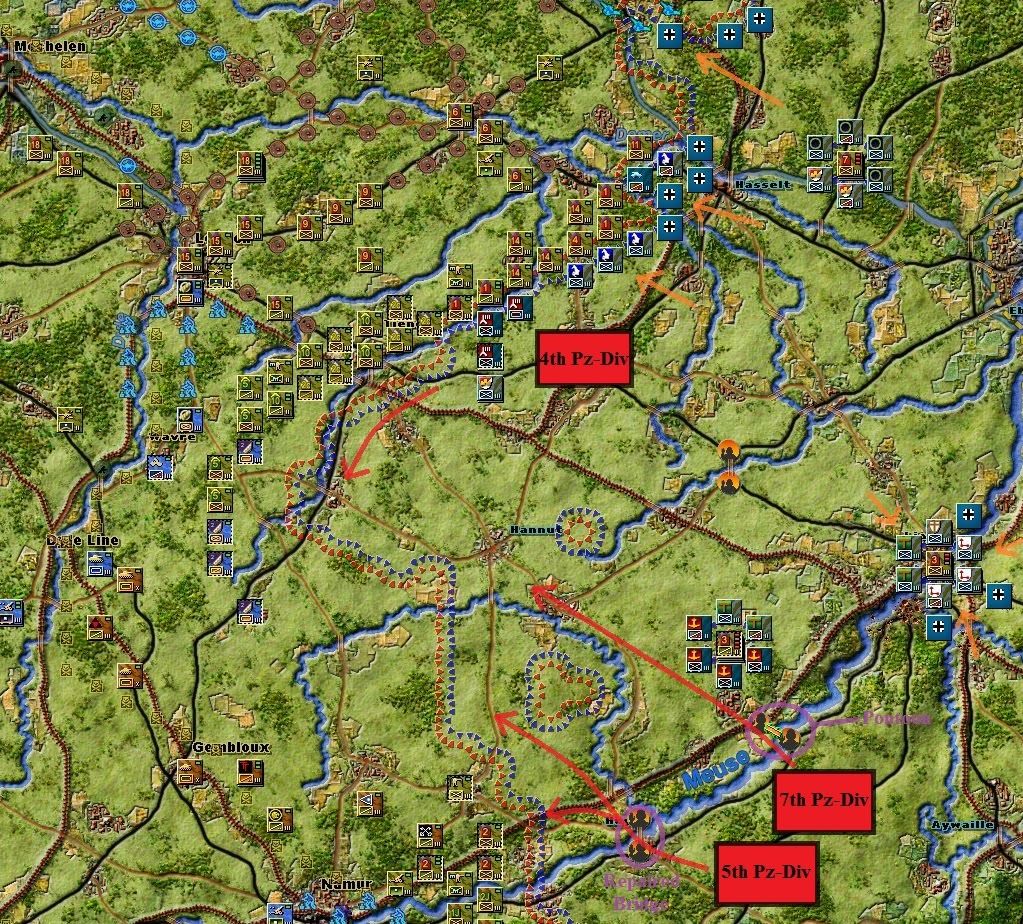
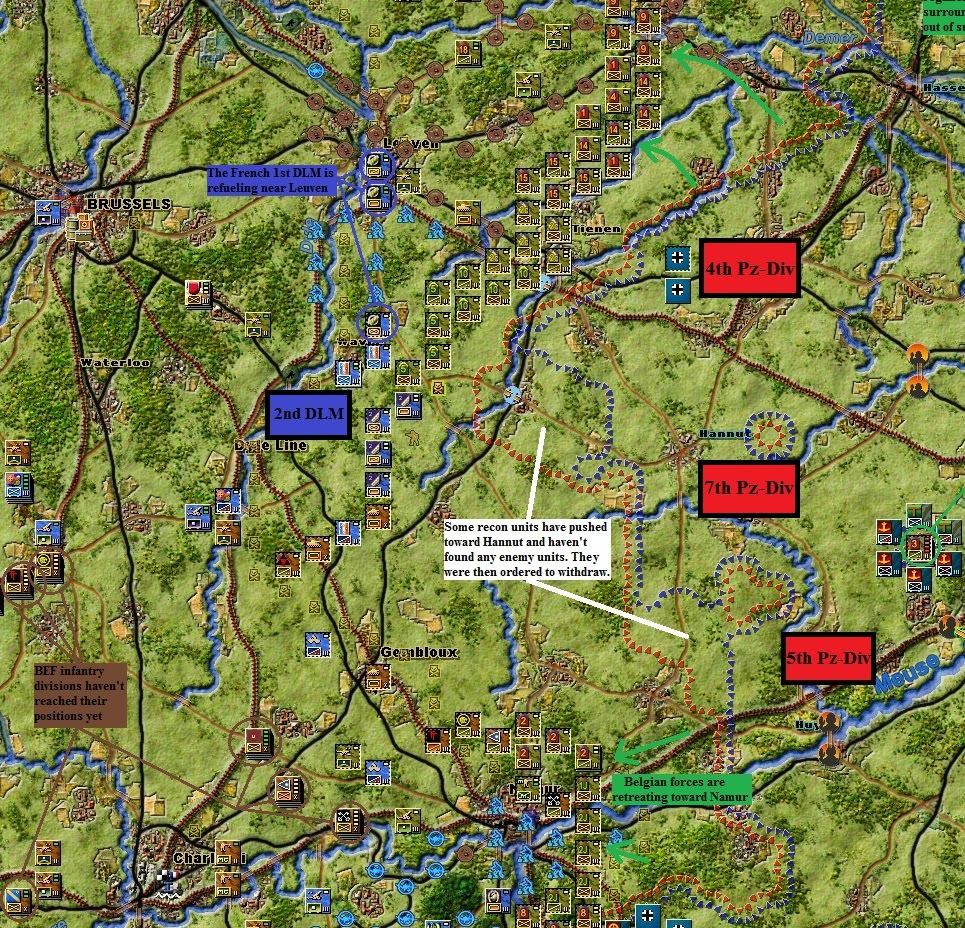
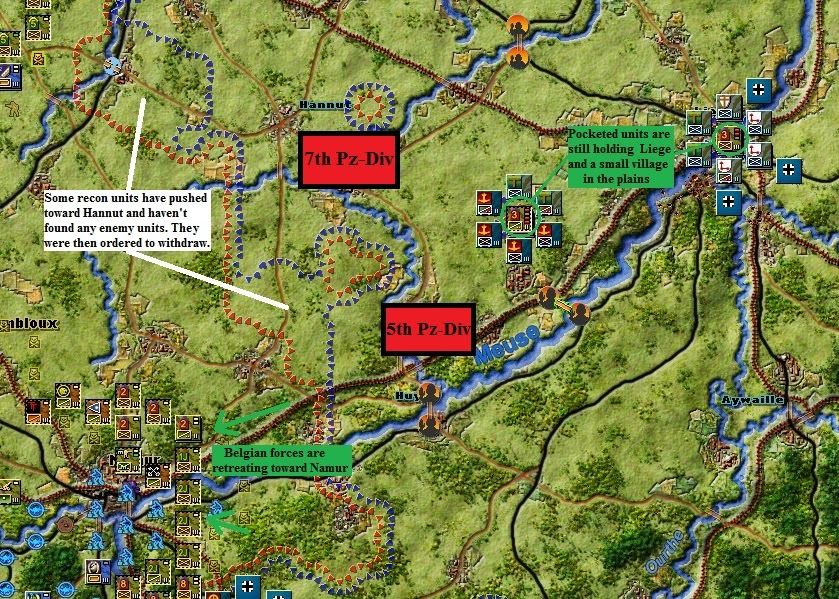
Meuse: waiting for the shock
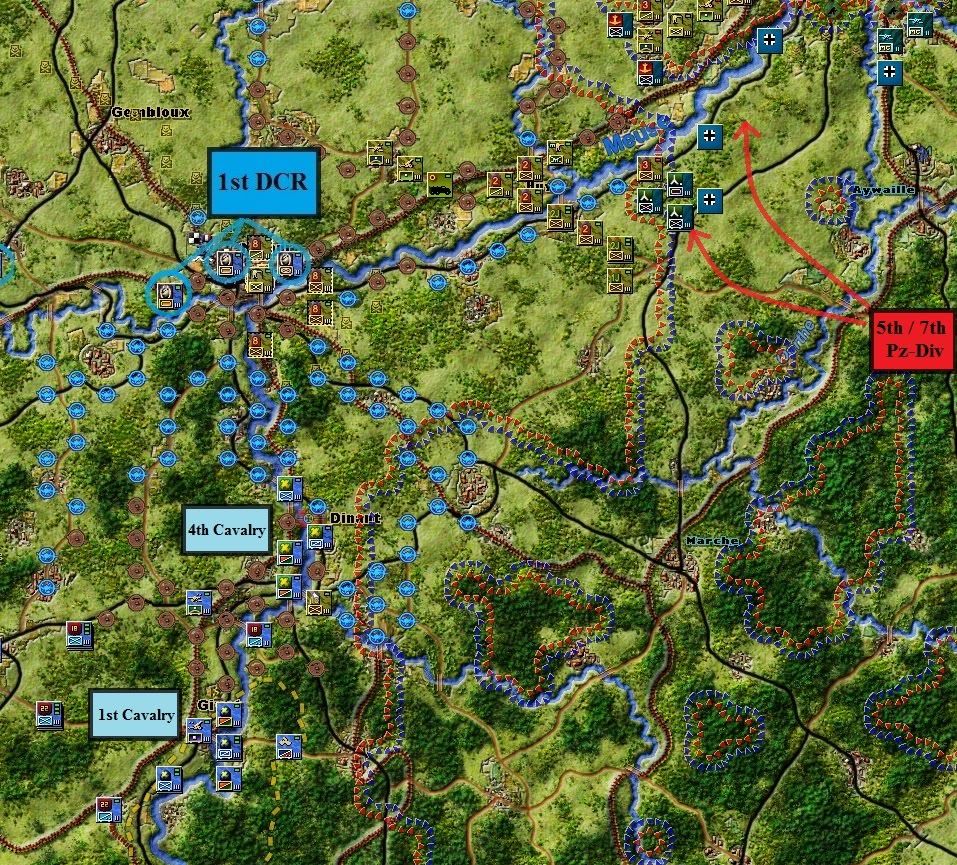
The 5th and 6th Pz-Div have reached the Meuse near Huy and made sure that the Belgian units retreating from Liege cannot escape. Other than that, enemy forces remain invisible, although they've nearly reached the bridges at Dinant and Givet, respectivley guarded by the French 4th and 1st Cavalry.
West of the Meuse, several divisions, including the 3rd DLM, are on their way to the river. You can also spot the point units of the BEF en route toward the Charleroi area.

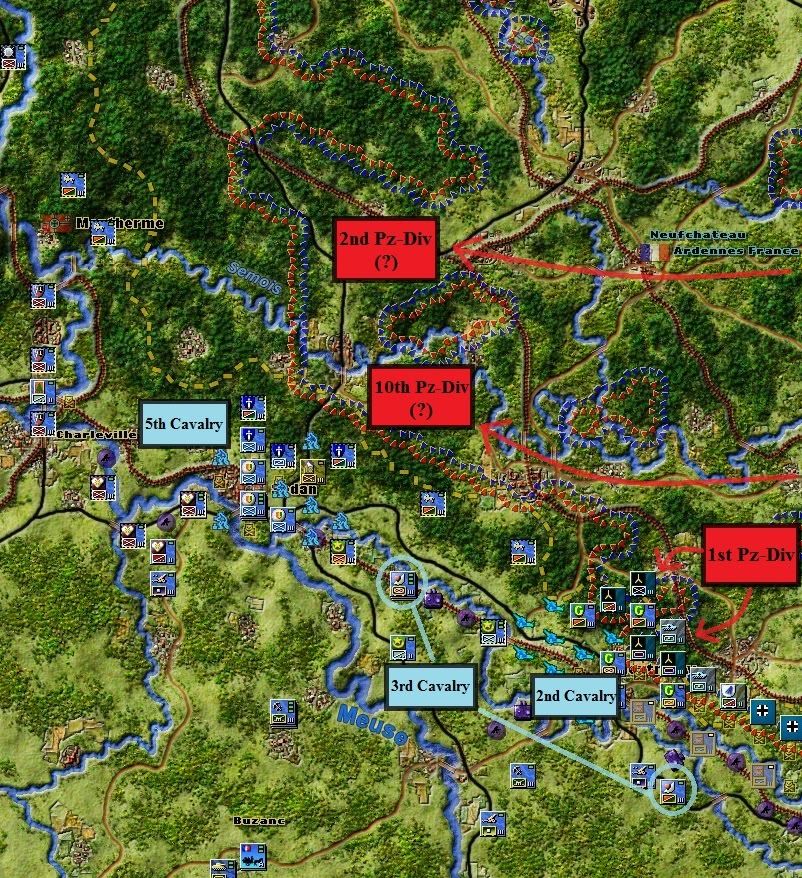
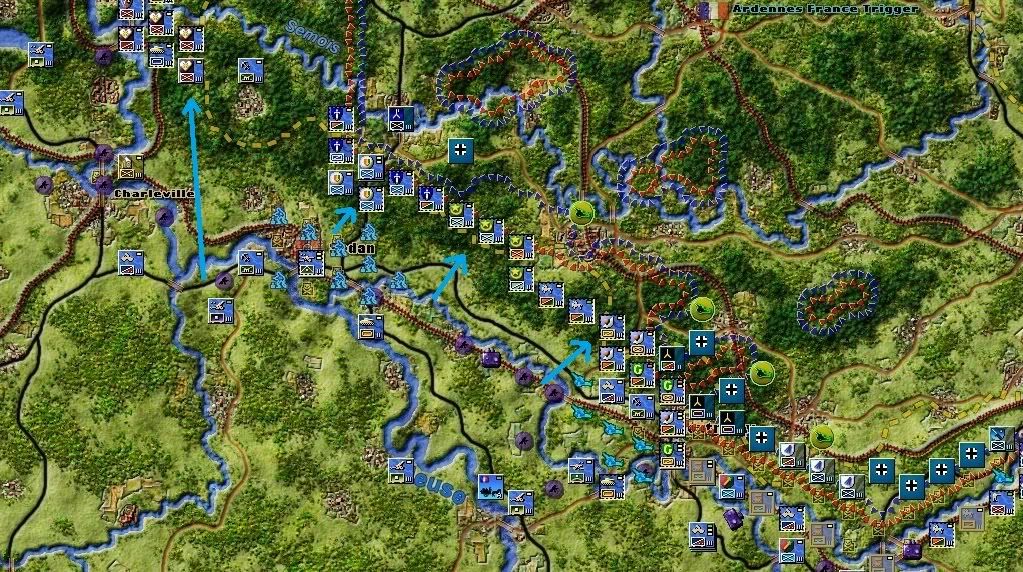
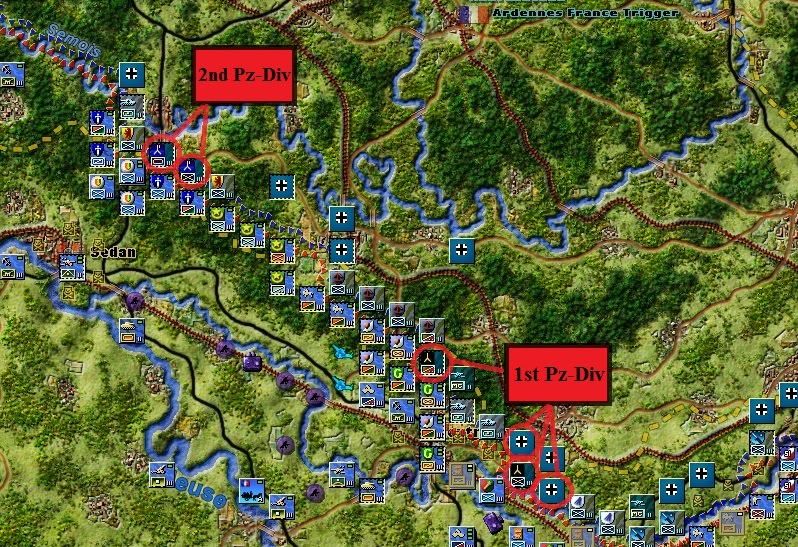
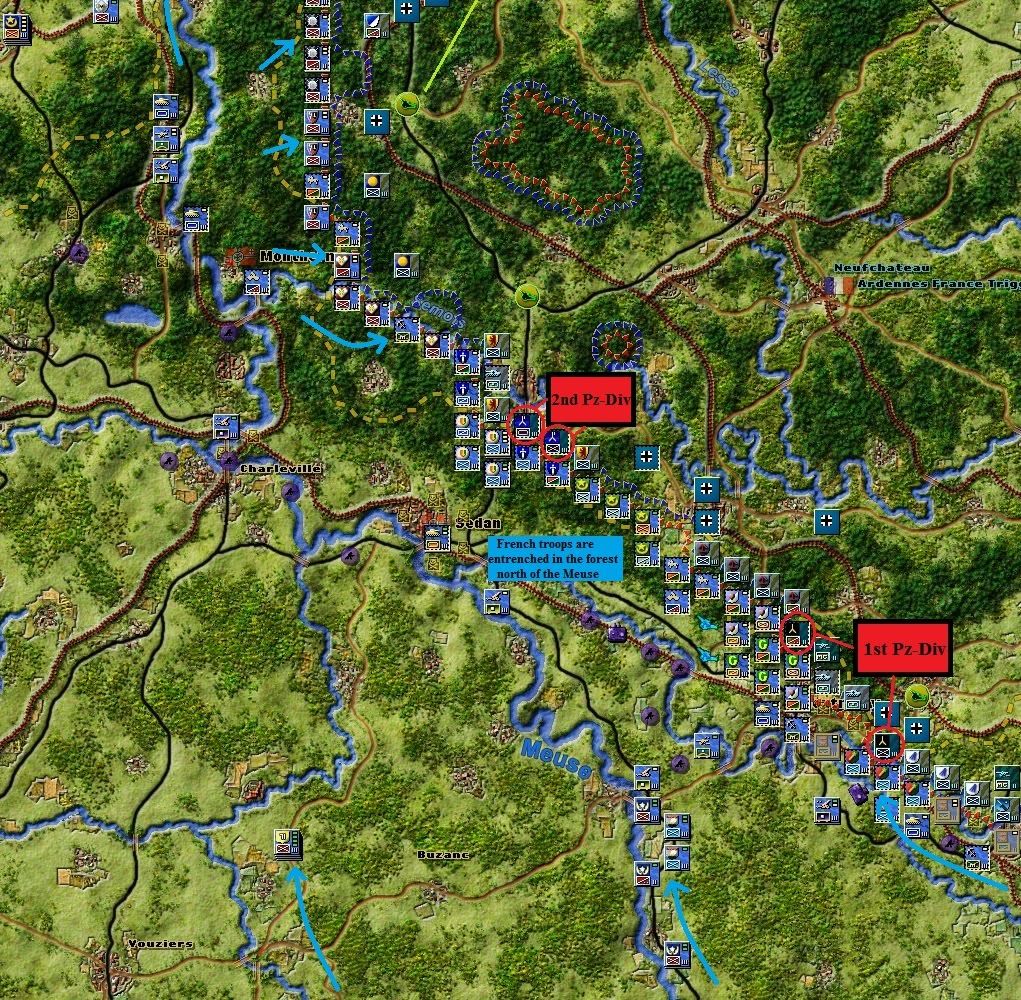
The recon units of the 2nd and 10th Pz-Div have been spotted near Sedan, but they seemed to turn back when they realized that the city was well defended. Are the two divisions regrouping before launching a larg scale assault on Sedan next turn, or have they decided to try their luck elsewhere?
My opponent has positioned his 1st Pz-Div near the town of Montmédy, putting a lot of pressure on the 2nd Cavalry, though no combat has taken place. I wonder what he intends to do there, given that the area has a limited strategic interest.
Finally, the location of the last two Pz-Div (6th and 8th Pz-Div) of the Kleist Gruppe is unknown.
Question: is the action easier to understand that way? What about the pic's size?
On his second turn, my opponent has proceeded to a series of predictable moves, but I've also spotted some of his Pz-Div at places where I didn't expect them to be - and I'm not sure what he intends to do with them.
Holland: breakthrough in the Waal-Rhine corridor
The German fallschirmjager northwest and south of Rotterdam have received reinforcements. They've moved toward the city, with the clear goal of surrounding it in order to prevent the weak Dutch regiment there from getting any outside support. Meanwhile, a fallschirmjager battalion has pushed east from Dordrecht to reach out to the incoming 9th Pz-Div (see next pic)
As expected, the Germans have completely ignored the main northern Dutch line of defense between the Rhine and the Zuiderzee. Instead, the SS Verfugungs Mot-Div has pushed west in the Rhine-Waal corridor, obliterating the regiment I had left there. My opponent showed his wile with the 9th Pz-Div: expecting a tough resistance on the southern road through Hertogenbosch, he instead used a pontoon unit to cross the Waal. With their forces combined, the two elite German divisions are going to be very hard to stop - espcially considering that the terrain between the Waal and the Rhine is mostly plains.
Note: no regiments of the Verfugungs and 9th Pz-Div are visible on this screenshot simply because they're not near any of my units - but I've seen them operate while watching my opponent's turn.
In the southern part of Holland, I have had one big surprise: while watching my opponent's turn unravel, I spotted the 3rd Pz-Div near Eindhoven. The 3rd Pz-Div is one of the two Pz-Div of the 6th Army: usually, the German player chooses to use both of them in the plains southwest of Maastricht. But here, it seems that my opponent has decided to use it further north - though for what goal I do not know. This area doesn't have much strategic value: maybe he is going to try a raid on Antwerp by going down the road southwest through Turnhout.
During the assault on Eindhoven, my opponent used heavy artillery to assist in destroying my unit entrenched in the city, and it left a lot of cratering in the hex and adjacent hexes (=will cause movement penalty for both sides on those hexes in the next two turns ).
Belgium: outpaced
As expected, the region north of the Albert Canal is neglected by the Axis player. The 3rd Pz-Div has gone to Eindhoven, and enemy presence here is limited to a few infantry divisions advancing west and trying to pocket Belgian stragglers.
Orange arrows are for secondary infantry movements, while red arrows show armored and motorized units movement.
Following its breakthrough at Maastricht, the 6th Army is now advancing at full speed in the plains. Whilst German infantry keeps pressuring the 1st and 4th Belgian divisions at Hasselt, the 4th Pz-Div has easily disposed of the meager units we had left in the plains to slow it down. It pushed resolutely west toward the Dyle and its point units reached the town of Tienen: obviously, my opponent is hoping to pocket the Belgian units still defending the Albert canal to the north.
The 20th Mot-Div has cut the only way of retreat of the Belgian 3rd division retreating from Liege. Combined with the 5th and 7th Pz-Div arriving from the south bank of the Meuse, this is a textbook pincer movement maneuver. The French 1st DCR in Namur is too far way - and the area to heavily interdicted - to be of any help.
And here is a zoomed-out view of the rest of the Belgian forces. Those divisions entrenched behind the Dyle at Willebroek and Mechelen will prove useful when I play my turn.
Meuse: waiting for the shock
The 5th and 6th Pz-Div have reached the Meuse near Huy and made sure that the Belgian units retreating from Liege cannot escape. Other than that, enemy forces remain invisible, although they've nearly reached the bridges at Dinant and Givet, respectivley guarded by the French 4th and 1st Cavalry.
West of the Meuse, several divisions, including the 3rd DLM, are on their way to the river. You can also spot the point units of the BEF en route toward the Charleroi area.
The recon units of the 2nd and 10th Pz-Div have been spotted near Sedan, but they seemed to turn back when they realized that the city was well defended. Are the two divisions regrouping before launching a larg scale assault on Sedan next turn, or have they decided to try their luck elsewhere?
My opponent has positioned his 1st Pz-Div near the town of Montmédy, putting a lot of pressure on the 2nd Cavalry, though no combat has taken place. I wonder what he intends to do there, given that the area has a limited strategic interest.
Finally, the location of the last two Pz-Div (6th and 8th Pz-Div) of the Kleist Gruppe is unknown.
Question: is the action easier to understand that way? What about the pic's size?

Now its great! I can see everything perfectly.
It seems that German player intends to quickly eliminate Holland - his forces there got some aid. Other that that its a classic full frontal assault with some encirclements. Hopefully next turn we will see him trying to remove your strong forces fro their entrenched positions. Where are his air assets allocated?
It seems that German player intends to quickly eliminate Holland - his forces there got some aid. Other that that its a classic full frontal assault with some encirclements. Hopefully next turn we will see him trying to remove your strong forces fro their entrenched positions. Where are his air assets allocated?
GarfunkeL
Racism Expert
Aye, a good improvement!
zool
Arcane
- Joined
- Oct 26, 2009
- Messages
- 897
Turn 2 (Allied) - Waiting for the shock
Most of my surprised units have now been freed. Time to act! The priorites are to delay the German 18th Army as much as possible in Holland, to make sure Belgian units can retreat toward the Dyle river unhindered, and finally to hold the bridges over the Meuse - and wait for the inevitable shock there.
: Too late, fools!
: I don't think so, old chap.
: Well, your BEF is very slow. Compare that with the French natural agileté and quick pace. En avant, mes amis!
: Help, those German tanks are a little too close from Brussels for my liking!
: Yeah, tell me about that! Rotterdam is already surrounded by German paratroopers.
Holland: reaction time
Rotterdam is at risk of being surrounded and taken by the German paratroopers, who hold airfields through which they reinforcements every turn. My troops are too weak to retake those airfields, so instead of attacking them, I'm going to be attacking from all sides, making it impossible for the paratroopers to create a secure area.
West of Rotterdam, one of my regiments crossed the Rhine estuary to put pressure on the fallschirmjagers' west flank. I've also slipped two regiments of the same division between the paratroopers progressing toward the city and their drop zone/airfield northwest of Rotterdam. This should prevent supply from reaching them and, for good measure, I used an artillery unit and that British destroyer's guns to interdict the area (yellow and green artillery counters). Troops are pouring in from the north and the east.
In addition, the southern part of the fallschirmjagers-controlled area is also under pressure. A cavalry battalion has progressed west toward Dordrecht, while troops from the 6th Division and other units also progress toward the town from the southeast. The German battalion my opponent had sent east to link up with the 9th Pz-Div is now surrounded.
Dutch troops are so weak they can barely put up an attack, and so short on anti-shock (ATGs) they cannot really defend against the 9th Pz-Div. The only possible strategy is to hamper enemy movement as much as possible.
Therefore, the useless northern line of defense is abandoned and units are sent toward the Rhine-Waal corridor, where they will try to slow down enemy movement as much as possible. Dutch units from the Hertogenbosch area are also sent north. Note the regiment of the 5th Division next to my opponent's pontoon over the Waal. Units inflict movement penalty to enemy units in their adjacent hexes. This will hamper the 9th Pz-Div is my opponent suddenly tries to make it cross back south of the Waal to attack Hertogenbosch. The Peel division (turquoise insigna) has abandoned its position on the canal and now directly defends Hertogenbosch. A lone regiment of the Peel division has blown up a railway bridge south of the town in case the 3rd Pz-Div tries to come up from Eindhoven. The strategic crosroad at Tilburg is already defended by a strongpoint.
Belgium: blocking the 4th Pz-Div
As I already pointed out, northern Belgium is not a crucial area of operation. My only worry there comes from the presence of the 3rd Pz-Div in Eindhoven. In case it heads southwest toward Antwerp, I've left some units entrenched in two towns on the road - they should be able to seriously delay it.
Other than that, the 11th Belgian Division is retreating toward the Albert Canal, but enemy interdiction slows it down considerably. I've also left three regiments of the 12th Division ready to blow up bridges on the Albert Canal. However, you'll notice that the easternmost crossing point has been left undefended, which is a cause for worry. An additional minefield has also been laid east of Antwerp.
West of Maastricht, Belgian units posted on the Dyle river and Albert Canal have been sent to the Tienen area to prevent the 4th Pz-Div from progressing further west, thereby buying some time for the Belgian divisions retreating toward the Dyle. French units (1st and 2nd DLM) are in thea area as well, while the Gembloux gap in only loosely covered by the point and armored units of the BEF.
My opponent now has two options: either he continues his movement west and tries to break through the hastily formed Belgian defense line at Tienen - but then he will find himself in the middle of a lot of enemy units. Or he shifts the course of the 4th Pz-Div south toward Hannut and Gembloux, meaning we're going to have a pretty historical first contact between the French Corps de Cavalerie (only this time supported by elements of the BEF) and the German Panzerkorps.
Finally, two regiments of the 3rd Division trapped by the German 20th Mot-Div find their way back to the citadel in Liege (which provides supply to this hex), while a few others entrench where they are and wait for their inevitable destruction. Belgian units also evacuate the Huy area after having blown up the bridge over the Meuse there and take defensive positions east and southeast of Namur.

Meuse: waiting for the shock
French troops continue to rush to the Meuse. Two of the four bridges at Dinant have been blown up - bad luck prevented me from blowing more. The 1st Cavalry has moved to protect the still-intact bridge between Dinant and Givet. The bridge in that latter town has been blown up, but the 22nd Division is still entrenched on the east bank to prevent the German panzers from approaching. Finally, the three bridges near Monthermé are still intact, but are well defended by several divisions.
At Sedan, my troops have taken advantage of the enemy's cautiousness and entrenched further north of the city. A regiment of the 2nd Pz-Div has been spotted, but I don't know where the rest of the division is. I'm a little weary about exposing my troops like that but I have a hunch that my opponent has decided not to go through Sedan - and moreover, my troops are all entrenched in forest terrain, which is very favorable to the defender.
A continuous defense line has been set up east toward Montmédy, which is defended by the 2nd and 3rd Cavalry divisions. After that, the Maginot line begins.
Most of my surprised units have now been freed. Time to act! The priorites are to delay the German 18th Army as much as possible in Holland, to make sure Belgian units can retreat toward the Dyle river unhindered, and finally to hold the bridges over the Meuse - and wait for the inevitable shock there.
Holland: reaction time
Rotterdam is at risk of being surrounded and taken by the German paratroopers, who hold airfields through which they reinforcements every turn. My troops are too weak to retake those airfields, so instead of attacking them, I'm going to be attacking from all sides, making it impossible for the paratroopers to create a secure area.
West of Rotterdam, one of my regiments crossed the Rhine estuary to put pressure on the fallschirmjagers' west flank. I've also slipped two regiments of the same division between the paratroopers progressing toward the city and their drop zone/airfield northwest of Rotterdam. This should prevent supply from reaching them and, for good measure, I used an artillery unit and that British destroyer's guns to interdict the area (yellow and green artillery counters). Troops are pouring in from the north and the east.
In addition, the southern part of the fallschirmjagers-controlled area is also under pressure. A cavalry battalion has progressed west toward Dordrecht, while troops from the 6th Division and other units also progress toward the town from the southeast. The German battalion my opponent had sent east to link up with the 9th Pz-Div is now surrounded.
Dutch troops are so weak they can barely put up an attack, and so short on anti-shock (ATGs) they cannot really defend against the 9th Pz-Div. The only possible strategy is to hamper enemy movement as much as possible.
Therefore, the useless northern line of defense is abandoned and units are sent toward the Rhine-Waal corridor, where they will try to slow down enemy movement as much as possible. Dutch units from the Hertogenbosch area are also sent north. Note the regiment of the 5th Division next to my opponent's pontoon over the Waal. Units inflict movement penalty to enemy units in their adjacent hexes. This will hamper the 9th Pz-Div is my opponent suddenly tries to make it cross back south of the Waal to attack Hertogenbosch. The Peel division (turquoise insigna) has abandoned its position on the canal and now directly defends Hertogenbosch. A lone regiment of the Peel division has blown up a railway bridge south of the town in case the 3rd Pz-Div tries to come up from Eindhoven. The strategic crosroad at Tilburg is already defended by a strongpoint.
Belgium: blocking the 4th Pz-Div
As I already pointed out, northern Belgium is not a crucial area of operation. My only worry there comes from the presence of the 3rd Pz-Div in Eindhoven. In case it heads southwest toward Antwerp, I've left some units entrenched in two towns on the road - they should be able to seriously delay it.
Other than that, the 11th Belgian Division is retreating toward the Albert Canal, but enemy interdiction slows it down considerably. I've also left three regiments of the 12th Division ready to blow up bridges on the Albert Canal. However, you'll notice that the easternmost crossing point has been left undefended, which is a cause for worry. An additional minefield has also been laid east of Antwerp.
West of Maastricht, Belgian units posted on the Dyle river and Albert Canal have been sent to the Tienen area to prevent the 4th Pz-Div from progressing further west, thereby buying some time for the Belgian divisions retreating toward the Dyle. French units (1st and 2nd DLM) are in thea area as well, while the Gembloux gap in only loosely covered by the point and armored units of the BEF.
My opponent now has two options: either he continues his movement west and tries to break through the hastily formed Belgian defense line at Tienen - but then he will find himself in the middle of a lot of enemy units. Or he shifts the course of the 4th Pz-Div south toward Hannut and Gembloux, meaning we're going to have a pretty historical first contact between the French Corps de Cavalerie (only this time supported by elements of the BEF) and the German Panzerkorps.
Finally, two regiments of the 3rd Division trapped by the German 20th Mot-Div find their way back to the citadel in Liege (which provides supply to this hex), while a few others entrench where they are and wait for their inevitable destruction. Belgian units also evacuate the Huy area after having blown up the bridge over the Meuse there and take defensive positions east and southeast of Namur.
Meuse: waiting for the shock
French troops continue to rush to the Meuse. Two of the four bridges at Dinant have been blown up - bad luck prevented me from blowing more. The 1st Cavalry has moved to protect the still-intact bridge between Dinant and Givet. The bridge in that latter town has been blown up, but the 22nd Division is still entrenched on the east bank to prevent the German panzers from approaching. Finally, the three bridges near Monthermé are still intact, but are well defended by several divisions.
At Sedan, my troops have taken advantage of the enemy's cautiousness and entrenched further north of the city. A regiment of the 2nd Pz-Div has been spotted, but I don't know where the rest of the division is. I'm a little weary about exposing my troops like that but I have a hunch that my opponent has decided not to go through Sedan - and moreover, my troops are all entrenched in forest terrain, which is very favorable to the defender.
A continuous defense line has been set up east toward Montmédy, which is defended by the 2nd and 3rd Cavalry divisions. After that, the Maginot line begins.
Kashmir Slippers
Magister
I really like this RP, but I have a few questions for you if you do not mind.
What counts as a victory for you? IS it lasting until the end of the scenario, a certain number of turns, or wiping out as many German units as you can. As far as I can tell, you are pretty far set out to lose just comparing starting units and conditions.
Another thing, for the less knowledgeable of your readers, could you put an author's summary at the beginning or the end your posts? It doesn't have to be too long, but since I (and probably a few other of us reading this LP) have never played this game, I don't really know how your opponent is playing let alone if he is doing well or not. I'm sorry that I am so unaware of how this is supposed to play out.
GarfunkeL
Racism Expert
With adequate support the DLM and DCR divisions should be able to go toe-to-toe with the Panzer divisions and definitely part of the BEF as well. But zool has to play the part of "static" defence, at least until he sees where the German player is committing his main thrust.
zool
Arcane
- Joined
- Oct 26, 2009
- Messages
- 897
Kashmir Slippers said:I really like this RP, but I have a few questions for you if you do not mind.
What counts as a victory for you? IS it lasting until the end of the scenario, a certain number of turns, or wiping out as many German units as you can. As far as I can tell, you are pretty far set out to lose just comparing starting units and conditions.
Another thing, for the less knowledgeable of your readers, could you put an author's summary at the beginning or the end your posts? It doesn't have to be too long, but since I (and probably a few other of us reading this LP) have never played this game, I don't really know how your opponent is playing let alone if he is doing well or not. I'm sorry that I am so unaware of how this is supposed to play out.
Hey, thanks for following!
Regarding what counts as victory, there are several ways to evaluate who wins at the end of the scenario. The inbuilt scoring system, which compares Victory Points (VPs) earned by each side, should be a good indication of the overall result of the battle. Players can get VPs by destroying enemy units and by holding strategic locations (most of them important cities).
However, I'll essentially consider I have won if I successfully prevent my opponent from replicating the historical scenario and/or if the scenario ends with both of use still fighting a slugging match, with no decisive German breakthrough.
Regarding your second query, it shouldn't be a problem. I already try to express in a line or two at the start of my posts the general "feeling" of the turn, so I'll try to expand that a bit. The two first turns I've already covered don't yet reveal enough to know how the battle is going on, but the fact that my opponent hasn't covered the Meuse area with aerial interdiction from the first turn on has allowed me to bring some additional divisions to the river. The three upcoming turns should set the tone of the battle: the Axis player gets two especially destructive "carpet bombing" attacks on turn 4 and two others on turn 5 to help him cross the Meuse - we'll see if he uses them effectively.
Malakal said:Do you plan on attacking anytime soon? Static defense is rather boring... and not really effective. Do you have any units that actually can win 1 on 1 with Germans?
A large scale offensive is completely out of the question. However, we may have a very nice fight if my opponent takes some risks with his 4th Pz-Div in the plains around Hannut and Gembloux: as you may have noticed, he only has one Pz-Div in the area, while I've brought the 1st and 2nd DLM, as well as some independent British armored battalions - and I've made sure to leave those and the 1st DLM slightly behind my lines, so that when he finds out they're there, it will be too late for him. That said, keep in mind that even if I have brought some AA units in the area, he could hamper my movements with a well-placed aerial interdiction.
GarfunkeL said:With adequate support the DLM and DCR divisions should be able to go toe-to-toe with the Panzer divisions and definitely part of the BEF as well. But zool has to play the part of "static" defence, at least until he sees where the German player is committing his main thrust.
Indeed. While I'd be delighted to engage his 4th Pz-Div in clear terrain near Hannut-Gembloux, my main focus for now is making sure that he doesn't cross the Meuse - which is probably going to prove very difficult.
zool
Arcane
- Joined
- Oct 26, 2009
- Messages
- 897
Turn 3 (Axis) - Encounter on the Meuse
At long last, the enemy has revealed his plan - and I must say I'm not entirely unhappy with how things are going. Actually, I'm even more satisfied about how I've pushed my opponent into doing pretty much what I wanted him to do.
As I suspected last turn, faced with a well-defended Sedan, my opponent chose to ignore the southern part of the Ardennes: instead, he seems to focus on the northern part of the Ardennes, that is the crossings over the Meuse at Dinant and Givet, where a decisive battle has already taken place and will continue to take place in the next few turns (more details on that below).
The second good news is that the Belgian army maneuver at Tienen, which aimed to prevent the 4th Pz-Div from pocketing half the Belgian army on the Albert canal, has been a complete success. At least four Belgian divisions have been saved from encirclment and certain destruction.
The third good news is that Holland is resisting pretty well. I have good hope that next turn, my opponent will be forced to use one of his precious Stuka special attacks in order to take Rotterdam: that's one less he'll be able to use to cross the Meuse.
Finally, a encouraging sign is that my opponent is using 3 out of his 10 Pz-Div in a defensive role - and moreover, the 9th Pz-Div in Holland struggles to pierce through the Dutch lines. Those Pz-Div are his best offensive assets, and he cannot win if he doesn't use them to perpetually outmaneuver my forces.
As for the bad news, I'm going to have quite a huge supply problem in Holland (see below why). Supply is also an issue at Givet and Dinant, the enemy's schwerpunkt, due to severe enemy aerial interdiction in that area. Finally, the two Pz-Div from the 4th Army have crossed the Meuse and moved into the plains near Gembloux - and the BEF is still a day away from his positions.
: By heavens, there are some fallschirmjagers in The Hague!
: Dear Wilhelmine, don't forget I still have a destroyer from the glorious Royal Navy waiting for you offshore.
: Ah, my brilliant maneuver at Tienen has worked! My Belgian army is saved! *goes back to preparing surrender plans just in case*
: Bah, I'm not interested in those forgettable tiny northern countries. The decisive battle will take place at Dinant, and that's where French troops will prove their superiority!
: Göring, are your Stukas ready for tomorrow? Those untermenschen will soon learn what "air superiority" means!
Holland: the 9th Pz-Div gets bogged down
Ok, I might have exaggerated a tiny bit when I said the 9th Pz-Div (and the Verfugungs Mot-Div) were "bogged down". Let's rather say that their advance in the Rhine-Waal corridor proceeds slower than expected, due to me having saturated that area with Dutch units. The two elite German divisions still managed to push back an engineer battalion entrenched in a village through which goes that east-west railway, and their point units reached the bridge on that Rhine-Waal canal. But my opponent had to use his aerial interdictions elsewhere, which means that I'll be able to move my units unhindered.
At Rotterdam, the German fallschirmjager have completed their surrounding movement of the city. Clearly, they're going to attack next turn - but will they need to use one of their precious special Stuka attack to take care of the strongpoint hidden under that entrenched AA unit? If they don't, they might fail to take the city. Anyway, my opponent has shown that he expects a quick Dutch surrender, as he doesn't even bother anymore with protecting his DZ and only source of supply northwest of the city.
Finally, he made a bold move. He noticed that I had left no troops to protect The Hague: with his last para battalion, he moved on the hex where the only Dutch supply source north of the Rhine is located. In effect, this means that my two supply trucks (the one in The Hague right next to the German unit, and the other one south of Zeeland hidden under a regiment of the 8th Division) cannot draw supply from anywhere. Both have an autonomy of two turns during which they can provide emergency supply (smaller radius than usual) to units around them: after that, my Dutch units north of the Rhine will not be supplied anymore. On the one hand, this is bad, because it kills any hope for a long term resistance (except if I manage to destroy the German battalion). On the other hand, it's not a big deal anyway because my opponent will probably use a Stuka special attack to take Rotterdam next turn, thereby triggering the Dutch surrender.
Belgium: the "Tienen maneuver" succeeds
As I expected, my opponent moved his 3rd Pz-Div from Eindhoven to the southwest. My two little defensive "hedgehogs" on the Eindhoven-Antwerp road (at Turnhout and at the crossroad further east) proved useful, forcing most of the 3rd Pz-Div to take a more southern road.
Further south, two regiments of the 11th Division are effectively surrounded by the advancing German infantry. An unidentified German unit has also nearly reached the easternmost bridge over the Albert canal. Finally, east of Hasselt, three surrounded Belgian regiments are now completely out of supply and will certainly surrender next turn.
My biggest success in Belgium so far is the so-called "Tienen maneuver" I made last turn: the reasoning was to bring units originally posted on the Dyle to the Tienen area in order to cover the retreat of the Belgian divisions coming from the Albert Canal. It seems that faced with a good defense line there, my opponent wavered, not knowing what to do with his 4th Pz-Div. He was still cautious enough not to send it to Gembloux, where my French DLMs and British armored units where waiting in ambush. He ended up moving the division near Tienen and sending its recon battalion to the southwest. All in all, the 4th Pz-Div was pretty useless this turn.
However, things are now getting more dangerous in the southern part of this sector. Indeed, the Germans repaired the bridge over the Meuse I had blown up at Huy and built a pontoon further east. While watching my opponent's turn, I spotted the 5th and 7th Pz-Div using those bridges to move to the north bank toward Hannut and Gembloux. Along with the 4th Pz-Div and the 20th Mot-Div (currently surrounding and mopping up a couple of Belgian units west of Liege), that makes four very dangerous German divisions concentrated near the Gembloux Gap. We may have some nice action in that area next turn.
Finally, at Liege, German heavy artillery has destroyed the fortress (which provided supply to the hex) and started attacking the city, where my units should hold for a turn or two before they've spent all their ammunition.
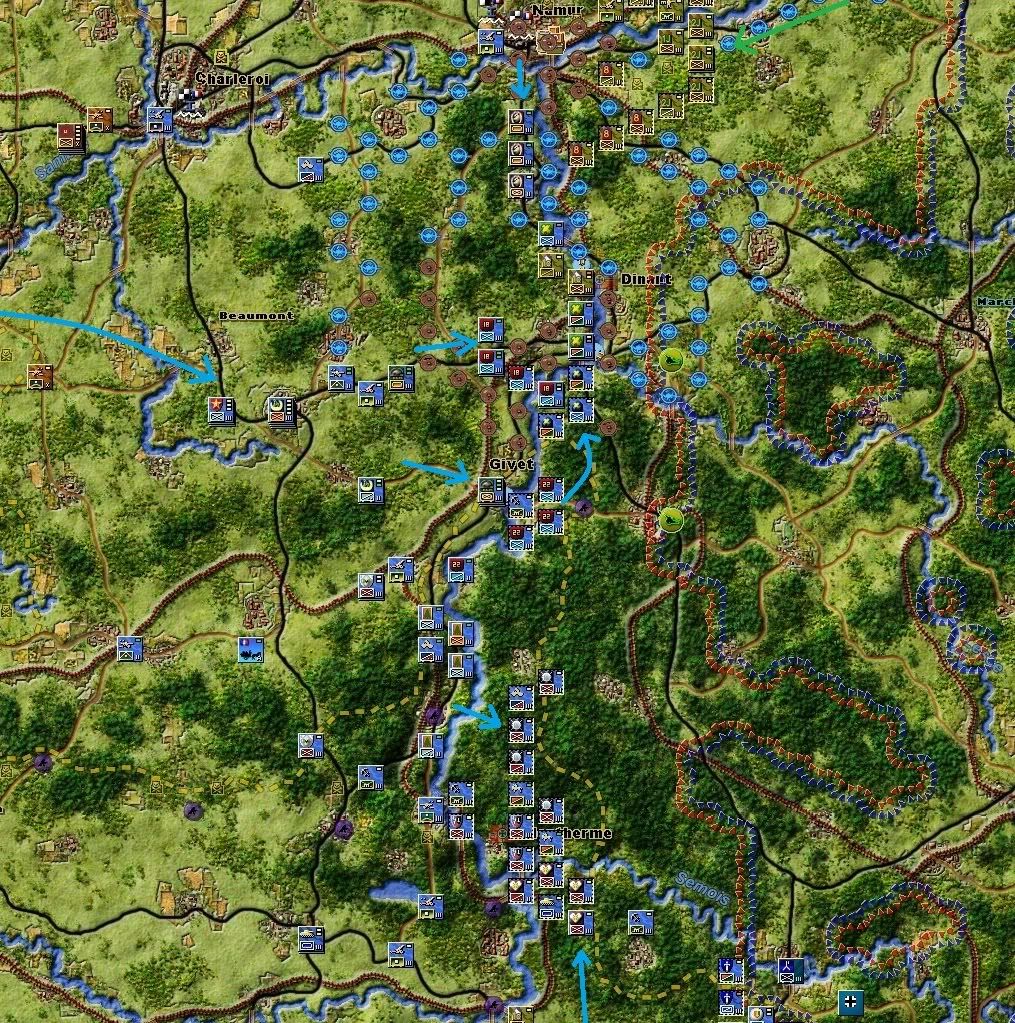
France: encounter on the Meuse
The Axis schwerpunkt has finally been identified: three Pz-Div (the 6th, 8th, and 10th) and three Mot-Div (the 2nd, 13th, and 29th) have gathered in the Givet-Dinant area. In a series of attacks, the 6th and 8th Pz-Div and the 2nd Mot-Div have attempted to cross the middle intact bridge south of Dinant. Thanks to a miracle (my opponent rolling a 1 when all other rolls would have resulted in my units retreating), he didn't push back the two French units guarding the north end of the bridge. However, those two units are out of supply: the constant aerial interdiction in this area prevents supply from reaching it. The situation is going to be very hot there in the next few turns.
Further south, my opponent hasn't made any push toward the bridges at Monthermé, which are guarded by substandard units. The terrain is mostly heavy forest, which makes it very easy for me to defend this area.

Finally, the two southernmost German Pz-Div are mostly harmless: the 2nd Pz-Div has gone on the defensive north of Sedan, while the 1st Pz-Div has conducted limited harassment attacks against the Maginot line east of Montmédy.
At long last, the enemy has revealed his plan - and I must say I'm not entirely unhappy with how things are going. Actually, I'm even more satisfied about how I've pushed my opponent into doing pretty much what I wanted him to do.
As I suspected last turn, faced with a well-defended Sedan, my opponent chose to ignore the southern part of the Ardennes: instead, he seems to focus on the northern part of the Ardennes, that is the crossings over the Meuse at Dinant and Givet, where a decisive battle has already taken place and will continue to take place in the next few turns (more details on that below).
The second good news is that the Belgian army maneuver at Tienen, which aimed to prevent the 4th Pz-Div from pocketing half the Belgian army on the Albert canal, has been a complete success. At least four Belgian divisions have been saved from encirclment and certain destruction.
The third good news is that Holland is resisting pretty well. I have good hope that next turn, my opponent will be forced to use one of his precious Stuka special attacks in order to take Rotterdam: that's one less he'll be able to use to cross the Meuse.
Finally, a encouraging sign is that my opponent is using 3 out of his 10 Pz-Div in a defensive role - and moreover, the 9th Pz-Div in Holland struggles to pierce through the Dutch lines. Those Pz-Div are his best offensive assets, and he cannot win if he doesn't use them to perpetually outmaneuver my forces.
As for the bad news, I'm going to have quite a huge supply problem in Holland (see below why). Supply is also an issue at Givet and Dinant, the enemy's schwerpunkt, due to severe enemy aerial interdiction in that area. Finally, the two Pz-Div from the 4th Army have crossed the Meuse and moved into the plains near Gembloux - and the BEF is still a day away from his positions.
Holland: the 9th Pz-Div gets bogged down
Ok, I might have exaggerated a tiny bit when I said the 9th Pz-Div (and the Verfugungs Mot-Div) were "bogged down". Let's rather say that their advance in the Rhine-Waal corridor proceeds slower than expected, due to me having saturated that area with Dutch units. The two elite German divisions still managed to push back an engineer battalion entrenched in a village through which goes that east-west railway, and their point units reached the bridge on that Rhine-Waal canal. But my opponent had to use his aerial interdictions elsewhere, which means that I'll be able to move my units unhindered.
At Rotterdam, the German fallschirmjager have completed their surrounding movement of the city. Clearly, they're going to attack next turn - but will they need to use one of their precious special Stuka attack to take care of the strongpoint hidden under that entrenched AA unit? If they don't, they might fail to take the city. Anyway, my opponent has shown that he expects a quick Dutch surrender, as he doesn't even bother anymore with protecting his DZ and only source of supply northwest of the city.
Finally, he made a bold move. He noticed that I had left no troops to protect The Hague: with his last para battalion, he moved on the hex where the only Dutch supply source north of the Rhine is located. In effect, this means that my two supply trucks (the one in The Hague right next to the German unit, and the other one south of Zeeland hidden under a regiment of the 8th Division) cannot draw supply from anywhere. Both have an autonomy of two turns during which they can provide emergency supply (smaller radius than usual) to units around them: after that, my Dutch units north of the Rhine will not be supplied anymore. On the one hand, this is bad, because it kills any hope for a long term resistance (except if I manage to destroy the German battalion). On the other hand, it's not a big deal anyway because my opponent will probably use a Stuka special attack to take Rotterdam next turn, thereby triggering the Dutch surrender.
Belgium: the "Tienen maneuver" succeeds
As I expected, my opponent moved his 3rd Pz-Div from Eindhoven to the southwest. My two little defensive "hedgehogs" on the Eindhoven-Antwerp road (at Turnhout and at the crossroad further east) proved useful, forcing most of the 3rd Pz-Div to take a more southern road.
Further south, two regiments of the 11th Division are effectively surrounded by the advancing German infantry. An unidentified German unit has also nearly reached the easternmost bridge over the Albert canal. Finally, east of Hasselt, three surrounded Belgian regiments are now completely out of supply and will certainly surrender next turn.
My biggest success in Belgium so far is the so-called "Tienen maneuver" I made last turn: the reasoning was to bring units originally posted on the Dyle to the Tienen area in order to cover the retreat of the Belgian divisions coming from the Albert Canal. It seems that faced with a good defense line there, my opponent wavered, not knowing what to do with his 4th Pz-Div. He was still cautious enough not to send it to Gembloux, where my French DLMs and British armored units where waiting in ambush. He ended up moving the division near Tienen and sending its recon battalion to the southwest. All in all, the 4th Pz-Div was pretty useless this turn.
However, things are now getting more dangerous in the southern part of this sector. Indeed, the Germans repaired the bridge over the Meuse I had blown up at Huy and built a pontoon further east. While watching my opponent's turn, I spotted the 5th and 7th Pz-Div using those bridges to move to the north bank toward Hannut and Gembloux. Along with the 4th Pz-Div and the 20th Mot-Div (currently surrounding and mopping up a couple of Belgian units west of Liege), that makes four very dangerous German divisions concentrated near the Gembloux Gap. We may have some nice action in that area next turn.
Finally, at Liege, German heavy artillery has destroyed the fortress (which provided supply to the hex) and started attacking the city, where my units should hold for a turn or two before they've spent all their ammunition.
France: encounter on the Meuse
The Axis schwerpunkt has finally been identified: three Pz-Div (the 6th, 8th, and 10th) and three Mot-Div (the 2nd, 13th, and 29th) have gathered in the Givet-Dinant area. In a series of attacks, the 6th and 8th Pz-Div and the 2nd Mot-Div have attempted to cross the middle intact bridge south of Dinant. Thanks to a miracle (my opponent rolling a 1 when all other rolls would have resulted in my units retreating), he didn't push back the two French units guarding the north end of the bridge. However, those two units are out of supply: the constant aerial interdiction in this area prevents supply from reaching it. The situation is going to be very hot there in the next few turns.
Further south, my opponent hasn't made any push toward the bridges at Monthermé, which are guarded by substandard units. The terrain is mostly heavy forest, which makes it very easy for me to defend this area.
Finally, the two southernmost German Pz-Div are mostly harmless: the 2nd Pz-Div has gone on the defensive north of Sedan, while the 1st Pz-Div has conducted limited harassment attacks against the Maginot line east of Montmédy.
Kashmir Slippers
Magister
Thank you very much for the summary. That is exactly what I was hoping for. It seems that you have been given a little bit of breathing room, but I'm sure that something will go wrong.
Tally forward and show those distasteful Nazis what for!
Tally forward and show those distasteful Nazis what for!
Orgasm
Barely Literate
- Joined
- May 4, 2010
- Messages
- 1,360
You know what would be kewl? If you could write on the screens at the appropriate locations. Than I would not have to double check what you mean by looking at the screen after I read a line. Since you edit the pictures already with arrows and whatnot, it may even save time if it were possible to position the text properly.
zool
Arcane
- Joined
- Oct 26, 2009
- Messages
- 897
Kashmir Slippers said:Thank you very much for the summary. That is exactly what I was hoping for. It seems that you have been given a little bit of breathing room, but I'm sure that something will go wrong.
Tally forward and show those distasteful Nazis what for!
Glad you're satisfied. And rest assured, something will go wrong, for certain.
Orgasm said:You know what would be kewl? If you could write on the screens at the appropriate locations. Than I would not have to double check what you mean by looking at the screen after I read a line. Since you edit the pictures already with arrows and whatnot, it may even save time if it were possible to position the text properly.
I'll see what I can do about that, but as you pointed out, positioning the text properly may be an issue.
Carlos' Bitch1
Arcane
Your opponent doesn't seem to know what his plan was. Unless he is more devious than I give him credit for, it looks like he is currently just running into unforseen opposition and trying anything. Unless there is some total dice failure elsewhere, the Gembloux gap is where the eyes of the world should now turn.
It seems that the war is going rather well and we can expect another trench warfare like in WWI. And another Schlieffen like plan, Ardennes manoeuvre has failed apparently.
Why wont you blow all of the bridges in the area? This should help. Unless you cant for some reason...
Why wont you blow all of the bridges in the area? This should help. Unless you cant for some reason...
zool
Arcane
- Joined
- Oct 26, 2009
- Messages
- 897
My opponent told me he only played this scenario once, so he might not have a perfect hang of the scenario. I've only played it once before too, as the Axis. It was enough for me to realise that the Kleist panzergruppe is indeed the most dangerous threat to the Allies. If allowed to break through in the plains southwest of Sedan, it is pretty much impossible to form a coherent front, and the only thing to do is retreat toward Dunkerque as fast as possible. However, the Axis's aerial interdiction and faster Pz-Div make that very difficult - I know my panzers reached Dunkerque before my opponent's troops in our first game.Blackadder said:Your opponent doesn't seem to know what his plan was. Unless he is more devious than I give him credit for, it looks like he is currently just running into unforseen opposition and trying anything. Unless there is some total dice failure elsewhere, the Gembloux gap is where the eyes of the world should now turn.
That said, my current opponent is very experienced - he even designed a few user-created scenarios. He may lack a good understanding of this particular scenario - though I would really really wait for a few turns before saying that - but he perfectly masters the game engine. I'm pretty sure he is going to make a smart use of his special Stuka attacks in the next two turns.
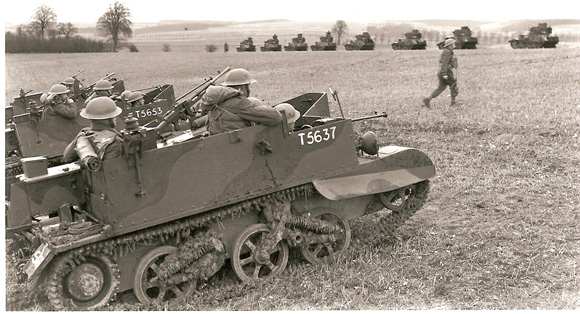
Great picture by the way. I can see it's a picture of the 51st Div but do you know where it was taken? I love those good old Bren Carriers.
Thanks. The next two turns are going to be decisive indeed.Cenobyte said:Very interesting strategic situation, I think the next few turns will show if you can stabilize your desired frontline and force the Germans into a war of attrition or not. Good luck!
Actually, I've really chosen one of the biggest and most complex scenario for that engine. A small-scale scenario such as Operation Husky (landing in Sicily) would have been much easier to follow.obediah said:Awesome thread. It fits nicely in the range of what I'm too derp to do yet not too derp to read.
Malakal said:It seems that the war is going rather well and we can expect another trench warfare like in WWI. And another Schlieffen like plan, Ardennes manoeuvre has failed apparently.
Why wont you blow all of the bridges in the area? This should help. Unless you cant for some reason...
I would wait a couple of turns before saying for sure that I've managed to force my opponent into a mostly static war. And apparently, we're not going to have a historical Fall Gelb plan with a breakthrough at Sedan indeed - but there too, let's wait a couple more turns.
For now, I haven't blown up the bridge at Sedan and the bridges at Monthermé because they're not threatened - and through them, I can provide supply to my units north and east of the Meuse. As for the other bridges at Givet and Dinant, I've tried to blow them up but I only suceeded for approximately half. All combat units and a few support units can blow up bridges but they must roll at least a 3 to do so - and I haven't been very lucky. Engineer units can usually blow up bridges with lower rolls but in this scenario, engineer units are considered as combat engineer units, and thus don't have this bonus.
Undead Phoenix
Arcane
Any chance you could post a zoomed out picture with the frontlines and main force concentrations shown? I'd like to see what the bigger picture looks like.
zool
Arcane
- Joined
- Oct 26, 2009
- Messages
- 897
After a short break, here's a new installment of this magnificent LP. I've tried to add a little more information on the pictures but unfortunately, I still need to write above each picture in order to clearly explain what's going on. Let me know how you think it reads.
Turn 3 (Allied) - Bracing for impact
As we finally reach turn 4 and 5, during which the Germans get their best chance to break through Allied lines with the help of their special Stuka attacks, the situation remains uncertain.
The Dutch army is in a critical position, due to a severe lack of supply and a failed counter-attack to retake (and then blow up) a strategic bridge. A second counter-attack to pierce Rotterdam's encirclement and relieve the city's defenders has also failed.
More importantly, after a first failed attempt to cross the Meuse, the Germans Pz-Div are going to have a second and much better shot at it, considering all their divisions have reached the river and they are going to benefit from the Stukas' support. The area around Dinant and Givet will probably be very hot - and I've brought all available troops there.
A second dangerous area is the Gembloux Gap, where point units of the BEF and a handful of weak French recon units have only been able to form a frail and discontinuous line of defense. The core of the BEF is still a day away from its assigned positions, and that leaves one turn to my opponent to easily break through my nearly-inexistent defense line and disorganize my defense system before it has even started to exist. A dangerous situation indeed.
Thankfully, the rest of the front is going pretty well: units north of the Albert Canal are on their way to Antwerp and the Dyle after having blown up most of the bridges over the canal. Meanwhile, the main body of Belgian forces is retreating west toward the Dyle in the Leuven area. So far, my opponent hasn't been able to find a way to pocket those units. In the Meuse sectors south of Dinant and Givet, there hasn't been much action and our line is getting stronger every turn.
: I fear my brave troops are not going to hold for long...
: Courage, my dear neighbor! By the way, I'm counting on you to protect my northern border.
: Winston, could you please tell your troops to hurry up? The Gembloux gap is still wide open. Compare that with the French rapid reaction at Dinant.
: :tommyleejoneslook:
: Tomorrow, the Third Reich will triumph. There is no other option.
Holland: potential disaster brewing
Two counterattacks by Dutch forces have failed, first at Rotterdam to relieve the city's defender, and then further east to retake the north end of a strategic bridge over the Waal, held by a Fallschirmjager battalion. My goal was to retake it and blow it up to prevent the 9th Pz-Div and Verfugungs Mot-Div from crossing south of the river. A potential disaster is looming: if the Germans do cross this bridge after having pushed back my units defending the south end, they will stumble upon my artillery units and my supply unit (currently hidden under a cavalry battalion just south of the two artillery units).
But the most pressing issue remains supply, as both my Dutch supply units north of the Rhine are pumping emergency supply (and will soon have used up all of it) since the supply dump at The Hague has been taken. I'll start attacking the fallschirmjager battalion holding it next turn.
And here's a bird-eye view of this clusterfuck:
Belgium: all eyes on Gembloux
In the northern part of Belgium, everything's going according to the plan. My units still north of the Albert canal have retreated south of it, and all bridges have been blown up (save for the easternmost one). The 13th Belgian Division, whose task is to defend Antwerp, has taken position on the western end of the canal to lend a hand to retreating units from the northern bank of the canal. In the southern part of this sector, the retreat of the main body of the Belgian army toward Leuven and the Dyle slowly continues, though it is hampered by enemy aerial interdiction.
If the 3rd Pz-Div doesn't plunge deeper than I think it can into my lines, and if the 4th Pz-Div goes to the south rather than launching a last attack on the Belgian bulge, the Belgian army retreat will be a total success, though two additional regiments of the 11th Division have been pocketed by the advancing German infantry this turn.
One of the two main points of attention next turn, the Gembloux Gap is still open: a Napoleonian powerful push by the 4th, 5th and 7th Pz-Div in what constitutes the center of my front could destabilize my whole defense system. The BEF is still not in position: that's what you get for sending the 1st French Army to Dinant - we'll see if it proves to be thebest least bad choice.
West, the 2nd French DLM and za few accompanying units are entrenched on a frail line in the woods near the Dyle river: it's possible my opponent will prefer pushing there to reach Brussels rather than going through the Gembloux Gap.
Finally, in the southern part of the sector,my Belgian units have braced themselves against an attack on Namur, but I'm not sure they can hold against a concerted attack by the 5th and 7th Pz-Div.
Finally, in the eastern part of the sector, some surrounded Belgian regiments are still courageoulsy holding out in Liege and in a small village in the plains, though ammo is getting scarce.
Meuse: bracing for impact
In the Givet-Dinant area, where a major enemy push is expected next turn, an additional bridge has been blown up, but I've been unable to blow up two bridges near Dinant. French divisions have been rushed to the area by whatever means possible (trucks, train, etc...): let's hope it will be enough to hold the shock. Our heavy artillery is shelling the east bank of the Meuse in order to hamper enemy movements and supply.
Supply is an issue on my side because of the intense enemy aerial interdicition over this area for the past few turns. Because of this, the 1st DCR hasn't received any fuel in two turns and is nearly immobile (i.e pretty much useless). The supply situation should improve with the arrival of new AA units and of the 1st and 9th Armies' supply units.
In the southern part of the sector, I've advanced a few hexes to entrench as far east as possible from the Meuse. Only two German infantry divisions are holding this heavily-forested area.
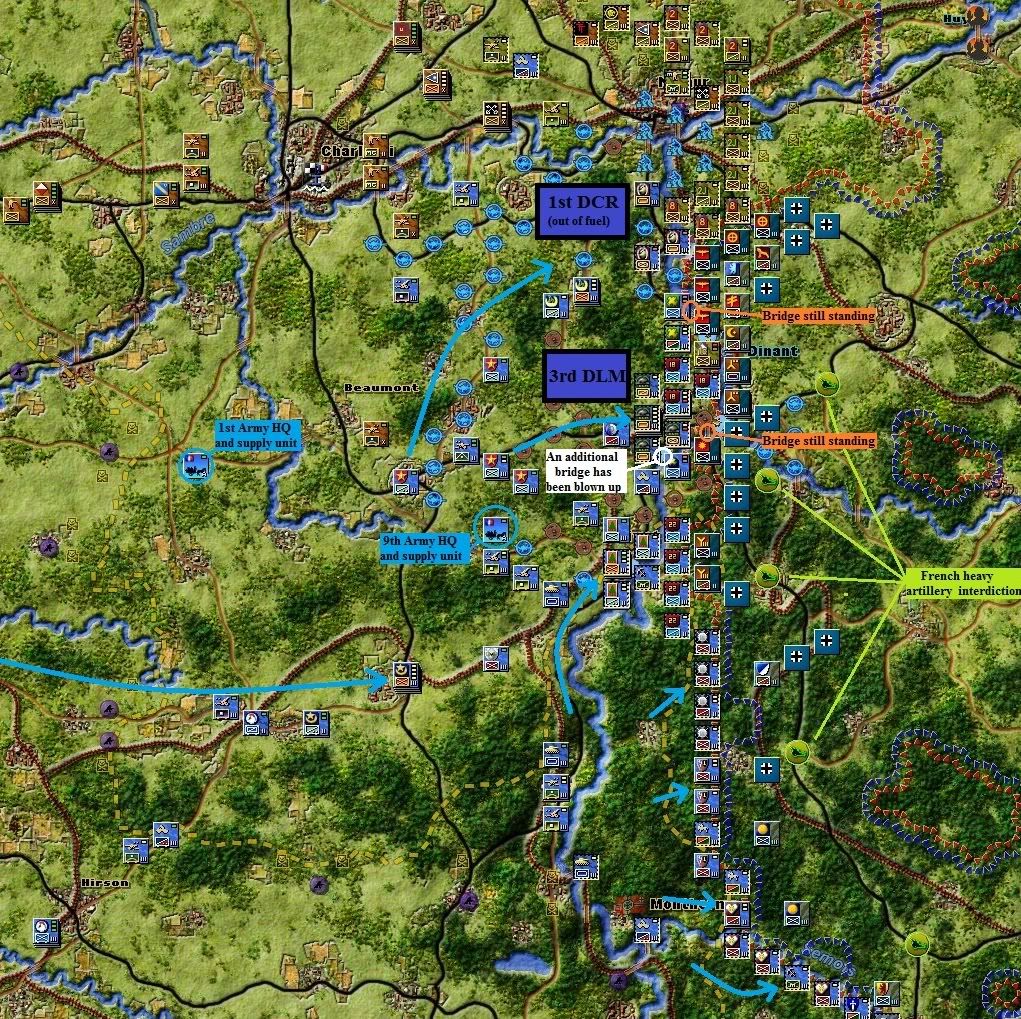
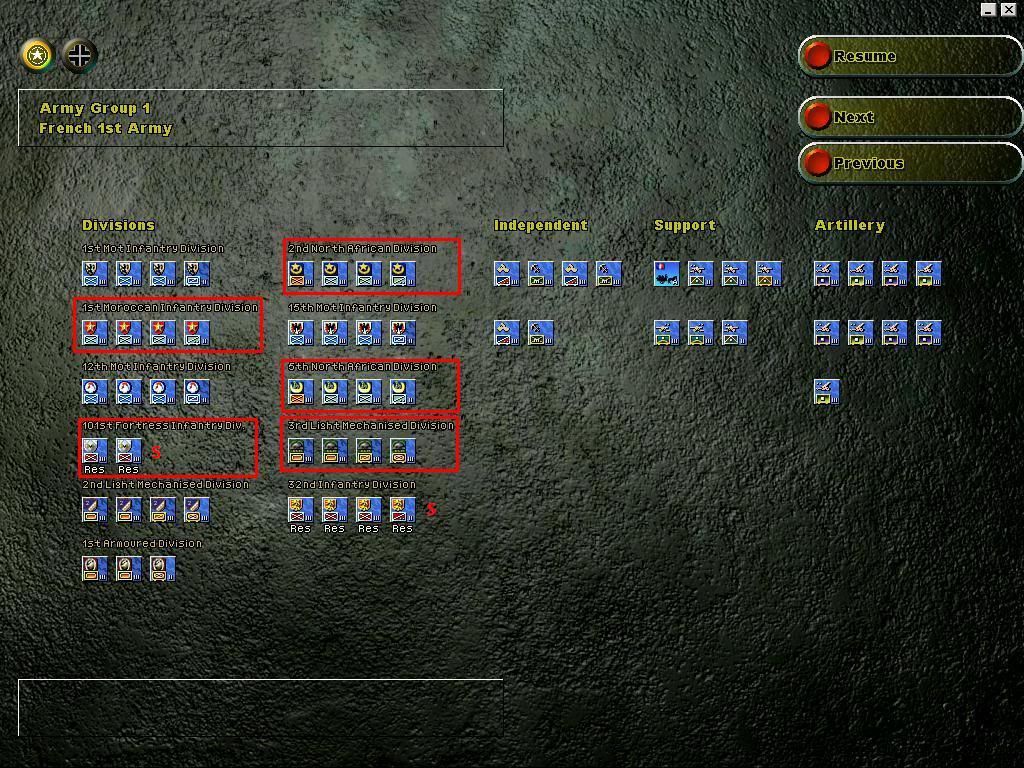
The units in the Dinant-Givet area are all from the French 1st and 9th Army (circled in red in the following pictures). You might have noticed the high number of colonial units:
DINA: Division D'Infanterie Nord-Africaine (North African divisions mixing Algerians, Tunisians and Moroccans)
DIMA: Division d'Infanterie MArocaine (purely Moroccan divisions). -> not to confuse with the aforementionned DINAs or with the DIMs (Division d'Infanterie Motorisée = Motorized Infantry Division).
Further south in the 2nd, 3rd and 4th Army, I even have a few DIC (Division d'Infanterie Coloniale) mostly composed of black soldiers from Senegal and other French colonies.
There are also a couple of very slow substandard Fortress Infantry Divisons, as well as many regular infantry divisions. The units with a red "S" next to them are substandards divisions, likely to surrender without fighting if attacked - though the surrender chance goes from 60% to 20% if they're adjacent to at least one regular unit.
Yeah, those French OOBs were a real mess.

The French divisions north of Sedan have been further reinforced in order to prevent any bad surprise. Other than that, the frontline is mostly static here. Fresh infantry divisions are arriving from the south of the sector, while infantry divisions which have been pulled off the Maginot line are arriving from the east to reinforce the sector around Montmédy, where the German 1st Pz-Div is operating.
Turn 3 (Allied) - Bracing for impact
As we finally reach turn 4 and 5, during which the Germans get their best chance to break through Allied lines with the help of their special Stuka attacks, the situation remains uncertain.
The Dutch army is in a critical position, due to a severe lack of supply and a failed counter-attack to retake (and then blow up) a strategic bridge. A second counter-attack to pierce Rotterdam's encirclement and relieve the city's defenders has also failed.
More importantly, after a first failed attempt to cross the Meuse, the Germans Pz-Div are going to have a second and much better shot at it, considering all their divisions have reached the river and they are going to benefit from the Stukas' support. The area around Dinant and Givet will probably be very hot - and I've brought all available troops there.
A second dangerous area is the Gembloux Gap, where point units of the BEF and a handful of weak French recon units have only been able to form a frail and discontinuous line of defense. The core of the BEF is still a day away from its assigned positions, and that leaves one turn to my opponent to easily break through my nearly-inexistent defense line and disorganize my defense system before it has even started to exist. A dangerous situation indeed.
Thankfully, the rest of the front is going pretty well: units north of the Albert Canal are on their way to Antwerp and the Dyle after having blown up most of the bridges over the canal. Meanwhile, the main body of Belgian forces is retreating west toward the Dyle in the Leuven area. So far, my opponent hasn't been able to find a way to pocket those units. In the Meuse sectors south of Dinant and Givet, there hasn't been much action and our line is getting stronger every turn.
Holland: potential disaster brewing
Two counterattacks by Dutch forces have failed, first at Rotterdam to relieve the city's defender, and then further east to retake the north end of a strategic bridge over the Waal, held by a Fallschirmjager battalion. My goal was to retake it and blow it up to prevent the 9th Pz-Div and Verfugungs Mot-Div from crossing south of the river. A potential disaster is looming: if the Germans do cross this bridge after having pushed back my units defending the south end, they will stumble upon my artillery units and my supply unit (currently hidden under a cavalry battalion just south of the two artillery units).
But the most pressing issue remains supply, as both my Dutch supply units north of the Rhine are pumping emergency supply (and will soon have used up all of it) since the supply dump at The Hague has been taken. I'll start attacking the fallschirmjager battalion holding it next turn.
And here's a bird-eye view of this clusterfuck:
Belgium: all eyes on Gembloux
In the northern part of Belgium, everything's going according to the plan. My units still north of the Albert canal have retreated south of it, and all bridges have been blown up (save for the easternmost one). The 13th Belgian Division, whose task is to defend Antwerp, has taken position on the western end of the canal to lend a hand to retreating units from the northern bank of the canal. In the southern part of this sector, the retreat of the main body of the Belgian army toward Leuven and the Dyle slowly continues, though it is hampered by enemy aerial interdiction.
If the 3rd Pz-Div doesn't plunge deeper than I think it can into my lines, and if the 4th Pz-Div goes to the south rather than launching a last attack on the Belgian bulge, the Belgian army retreat will be a total success, though two additional regiments of the 11th Division have been pocketed by the advancing German infantry this turn.
One of the two main points of attention next turn, the Gembloux Gap is still open: a Napoleonian powerful push by the 4th, 5th and 7th Pz-Div in what constitutes the center of my front could destabilize my whole defense system. The BEF is still not in position: that's what you get for sending the 1st French Army to Dinant - we'll see if it proves to be the
West, the 2nd French DLM and za few accompanying units are entrenched on a frail line in the woods near the Dyle river: it's possible my opponent will prefer pushing there to reach Brussels rather than going through the Gembloux Gap.
Finally, in the southern part of the sector,my Belgian units have braced themselves against an attack on Namur, but I'm not sure they can hold against a concerted attack by the 5th and 7th Pz-Div.
Finally, in the eastern part of the sector, some surrounded Belgian regiments are still courageoulsy holding out in Liege and in a small village in the plains, though ammo is getting scarce.
Meuse: bracing for impact
In the Givet-Dinant area, where a major enemy push is expected next turn, an additional bridge has been blown up, but I've been unable to blow up two bridges near Dinant. French divisions have been rushed to the area by whatever means possible (trucks, train, etc...): let's hope it will be enough to hold the shock. Our heavy artillery is shelling the east bank of the Meuse in order to hamper enemy movements and supply.
Supply is an issue on my side because of the intense enemy aerial interdicition over this area for the past few turns. Because of this, the 1st DCR hasn't received any fuel in two turns and is nearly immobile (i.e pretty much useless). The supply situation should improve with the arrival of new AA units and of the 1st and 9th Armies' supply units.
In the southern part of the sector, I've advanced a few hexes to entrench as far east as possible from the Meuse. Only two German infantry divisions are holding this heavily-forested area.
The units in the Dinant-Givet area are all from the French 1st and 9th Army (circled in red in the following pictures). You might have noticed the high number of colonial units:
DINA: Division D'Infanterie Nord-Africaine (North African divisions mixing Algerians, Tunisians and Moroccans)
DIMA: Division d'Infanterie MArocaine (purely Moroccan divisions). -> not to confuse with the aforementionned DINAs or with the DIMs (Division d'Infanterie Motorisée = Motorized Infantry Division).
Further south in the 2nd, 3rd and 4th Army, I even have a few DIC (Division d'Infanterie Coloniale) mostly composed of black soldiers from Senegal and other French colonies.
There are also a couple of very slow substandard Fortress Infantry Divisons, as well as many regular infantry divisions. The units with a red "S" next to them are substandards divisions, likely to surrender without fighting if attacked - though the surrender chance goes from 60% to 20% if they're adjacent to at least one regular unit.
Yeah, those French OOBs were a real mess.
The French divisions north of Sedan have been further reinforced in order to prevent any bad surprise. Other than that, the frontline is mostly static here. Fresh infantry divisions are arriving from the south of the sector, while infantry divisions which have been pulled off the Maginot line are arriving from the east to reinforce the sector around Montmédy, where the German 1st Pz-Div is operating.
GarfunkeL
Racism Expert
Going to be very interesting next turn for sure!
zool
Arcane
- Joined
- Oct 26, 2009
- Messages
- 897
Malakal said:Why not try moving the Peel division either-north east to stab in the back German forces advancing or west to retake Mwhatever bridges? Its really useless just standing there, I bet its not going to see any action.
Well, counterattacking northeast would probably disconcert my opponent but it wouldn't be very practical given that I would have to cross two large rivers - supply would quickly be an issue. More importantly, the Axis division which is putting pressure on the Peel division at Hertogenbosch would quickly move west, encircling the whole division.
I'm going to try to retake Moerdijk bridge next turn, but I only have a limited number of units and artillery - and Rotterdam and The Hague are my priority. Moreover, now that the 9th Pz-Div and Verfungungs Mot-Div have clearly engaged themselves in the Rhine-Waal corridor, the Moerdijk bridge has somewhat lost of its strategic significance. It's only really useful to the German player if he makes his armored spearhead take the southern road through Hertogenbosch - and then uses the Moerdijk bridge to reach Rotterdam.
GarfunkeL said:Going to be very interesting next turn for sure!
Definitely. I'm already having nightmares about a new Schlieffen plan disorganizing my whole defense system.


As an Amazon Associate, rpgcodex.net earns from qualifying purchases.