


Elzair
Cipher
- Joined
- Apr 7, 2009
- Messages
- 2,254
Helpful Stuff to know about the Playground
1. Posts per Page
Posts per page is reduced to 15 (instead of the normal 25) so people don't have to spam so many replies just to get the next set of LP images onto a new page. This is not currently in effect.
2. Filtering thread replies by User
You can filter threads by user id. EG: Say you're reading this awesome LP but rather than reading everyone's crap, you want to just read the stuff posted by the thread author. Well, simply add &filter=USERID to the url.
In this case, click on the user's profile and you'll see the URL has something like "u=11776" on the end. That's the user id. Take that id and add it to the end of your thread url:
From this: http://www.rpgcodex.net/phpBB/viewtopic.php?t=43820
To this (with &filter=11776): http://www.rpgcodex.net/phpBB/viewtopic ... lter=11776
Note how the thread paginates correctly with the filter. Also note that this works for any thread and with any user (IE: It doesn't have to be the thread's author).
Tutorial: On Making Screenshot-based Let's Plays
Since I have made LPs for ten (and counting) games, I thought I might share some of the tricks I have found. Since I prefer (and have only made) screenshot-based LPs, this is what I will cover. You are on your own for video LPs.
NOTE: I have only used quotation marks to designate file names. You should ignore them unless I say otherwise.
PROTIP: Use your initial post as a table of contents. I also suggest including an image appropriate to the subject matter of your LP.
PROTIP: I also suggest you come up with a title for every update of your LP.
Image Capturing Programs
There are many utilities you can use to take a screenshot of a game. The most basic way to do it is to press PrintScreen and paste the resulting image into MS Paint. Here are my three current favorite programs.
DOSBox
If your game can be run in DOSBox, you can use the built-in screenshot utility. Just press Ctrl+F5 to take a picture. (NOTE: In OSX, press fn+ctrl+F5 to take a picture.)
All the screenshots are saved in the capture directory, which is defined in your dosbox.conf file (which, in OSX, can be called "DOSBox version# Preferences". In Windows XP, this folder is usually located in whatever place you installed DOSBox. In OSX (at least in 10.4), the default location is ~/Library/Preferences/capture. MAJOR CAVEAT: When I used the latest version of DOSBox under Windows 7, it stored my screenshots in a temporary location, and when I rebooted my computer, the files were lost. You should edit the config file to make DOSBox place them in a more permanent location (I place them in My Pictures).
The pictures are named after the executable file DOSBox is currently running followed by an underscore and a three digit number: "program_xxx.png" (more if there are over one thousand screenshots of the same program). NOTE: If there are already screenshots of a program, DOSBox will start with one more than the highest current number; if I am taking screenshots of Ultima IV (whose executable is named ultima.com), and there is already an "ultima_501.png", then the next screenshot will be named "ultima_502.png". The screenshots are saved as PNGs and always have the same resolution as the emulated program, which is usually 320x200.
PROTIP: Since I like to keep organized albums, I add an extra zero to the file names if I know I will have more than one thousand of them. See below for how to do that.
FRAPS
If you (and your game) are using a recent version of Windows, you could try FRAPS. It is mostly used for video-capture, but it can take screenshots as well (the default button is F10, I think, but it can be remapped). The screenshots are, by default, stored in FRAPS' installation directory, but you can change that.
One nice thing about FRAPS is that, if your game is using DirectX 9+, it can display a yellow FPS counter in the corner of the screen that flashes white whenever you take a screenshot. This is helpful when you are taking many sequential screenshots (for example, of dialogue) and want to avoid duplicates.
However, FRAPS is shareware, and the free version can only save images in BMP with the current resolution of the game. Furthermore, the naming scheme for screenshots, which cannot be changed, is "program_name YYYY-MM-DD HH-MM-SS-CS.bmp"; for example, here is the name of a screenshot I took of Oblivion: Oblivion 2009-07-04 17-26-04-06.jpg. Since I prefer my file names to just be a prefix followed by a number, this is a negative. Since many image-hosting sites, such as Photobucket, strip whitespace out of filenames, working with a lot of FRAPS images at once is a PITA. Also, I think FRAPS can only be used when the game is run in full-screen mode.
ZScreen
If your game is a little older (up to DirectX 8) or uses OpenGL (I think), you could try ZScreen. It can save images anywhere (even on a remote FTP server), automatically upload images to several image-hosting sites, capture the full screen, capture a window or a selection of a window, name files with a very customizable schema, save files in several formats, automatically adjust the resolution, and use custom hotkeys. My only problem with ZScreen is that it does not have a way to instantly notify me when I take a screenshot of a game in full-screen mode. I use ZScreen for my ongoing LP of Ultima VII: The Black Gate.
!Quick Screen Capture
I do not know much about !Quick Screen Capture, but Brother None recommended it.
Screenshot Captor
Screenshot Captor was recommended by Zeus. I do not know much about it, but he said it was another option for taking screenshots of games too old for FRAPS.
Image Editors
This section is mostly a listing of programs that can resize/rename multiple files. If you want to edit a specific image, you can always use GIMP, Paint.NET, Picasa, Photoshop, and many others.
IrfanView
IrfanView is a freeware program that supports batch renaming/conversion of images. Before I started using ZScreen for my Ultima Underworld and VII LPs, I would take screenshots with the built-in DOSBox screenshot utility and then use IrfanView to rename them and increase them to 800x600. Irfanview can rename files, change their resolutions, or convert them to different formats. For example, I found character portraits extracted from several games I LPed, but they were stored as 30x30 ICOs; I used IrfanView to convert them to 80x80 PNGs.
I have noticed a few problems. If you tell Irfanview to change an image to a specific resolution, you MUST uncheck the option to preserve aspect ratio. This is why many of my earlier UW1 screenshots are 800x500 instead of 800x600. Furthermore, IrfanView has only a limited ability to modify the file names of input files; it can replace three specific strings (i.e. no regular expressions or escape characters) with three other specific strings. For instance, one can strip all zeroes from filenames by entering "0" in a search field and leaving the corresponding replace field blank. Mostly, IrfanView can only give the output files a completely new name based on a limited naming schema (however, it can certainly leave the name unaltered); for example, using the schema "ultimaiv####" will rename all the selected files ultimaiv0000, ultimaiv0001, and so on (although one can specify any starting number).
Automator
If you are using OSX, you are kinda out of luck. You can use Automator to create a batch renaming script; you should supposedly be able to resize/convert images, but I have not managed to do it under 10.4.
1. Open Automator (it's in Applications).
2. Select "Finder->Ask For Finder Items" and drag it right. To save time, change the "Start At" option to your image capture directory. Check "Allow Multiple Selection".
3. Select "Finder->Copy Finder Items" and drag it right. Change "To" to your desired destination directory.
4. Select "Finder->Rename Finder Items" and drag it to the right. Click on the top list box and go down to "Replace Text". Then type in the prefix of your file names (ex:"ultima_") and replace it with something prettier (ex:"ultimaiv").
5. You can experiment with resizing and conversion options, but, as I said above, I could not get them to work.
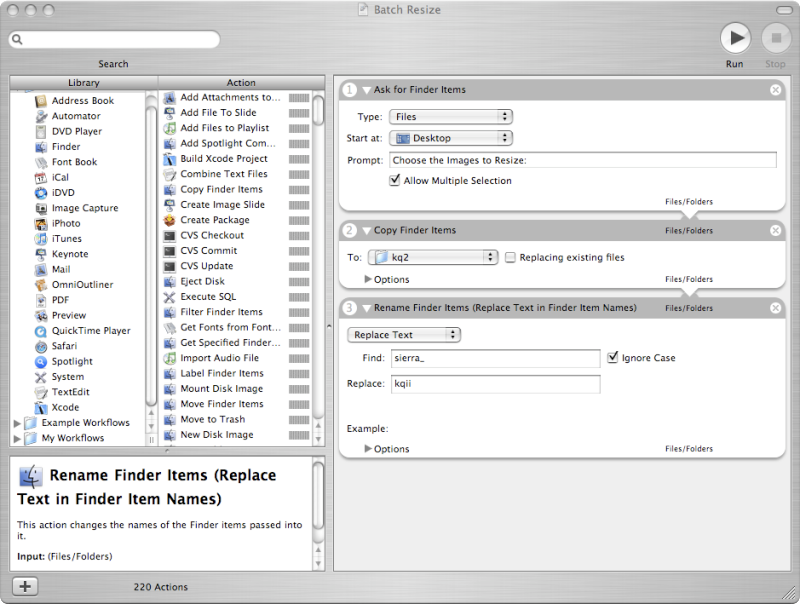
Image Hosting Sites
Now that you have taken your screenshots, you need to post them on the web. Here are some options.
Photobucket
I use Photobucket for all my screenshots. This is the only one I have much experience with. You can create a free account that can store 500MB of images and has a monthly bandwidth allotment of 10GB. You can create multiple albums to store screenshots in. The normal uploader will upload 200 screenshots at a time; the buggy, Java-based bulk-uploader can upload 255. You can supposedly modify your uploaded images, but I have not had much success doing it. My only major beef with the service is that I cannot easily rename uploaded files.
ImageShack
I do not know much about ImageShack.
Picasa Web Albums
I do not know much about Picasa Web Albums. I assume it is integrated into the Picasa image editor.
Flickr
I do not know much about Flickr.
Imgur
Imgur was another recommendation by Brother None.
Convenience Utilities
Now that you have taken all your screenshots and posted them on the web, you now only have to write the LP itself. Here are some utilities to help you. Since I am lazy right now, I will largely provide only *nix shellscripts and C source files.
PROTIP: Since you are likely using Windows, I will try to write a few batch files to do some of this stuff later. Until then, you can use Cygwin to get a *nix shell for Windows.
ImagePrinter.sh
The following two examples will help you create a file with the images you want to use in HTML format.
ImagePrinter.c
Writing the LP
Now, some of you may be happy with your system's default text editor (NotePad, WordPad, TextEdit, Emacs, etc.) After writing many LPs, I began to crave a WYSIWYG editor, so I could simultaneously view the finished product and edit it. You may notice that the images and comments in my earlier Ultima LPs sometimes seem out of synch; this is because I often had to guess which image contained the picture I wanted. I found a few WYSIWYG BBcode editors, but they did not do everything I needed, so I looked around for some WYSIWYG HTML editors.
Amaya
I ended-up using Amaya. It is open-source, cross-platform and does everything I need. The interface is pretty self-explanatory. You can add comments in between images, delete and move around images and so on. The only notable things are that Amaya uses <strong></strong> for bolding and <em></em> for italicizing.
PROTIP: If you are transcribing dialogue and want to use character portraits, try typing the name (in lower case) of the NPC speaking before each dialogue. You can then use your editor's find/replace function to batch convert these names into image tags; however, make sure to check "Match Case" and "Replace Full World Only". Since most names began with a capital letter, you should not have to worry about placing random words with portraits.
PROTIP: SAVE OFTEN!!
I know there are other WYSIWYG HTML editors out there, but I have no knowledge of them.
After you finish writing the LP, you can use the Cool HTML to BBCode Converter to convert your file to BBCode.
PROTIP: If you used Amaya, first open the HTML file in a text editor (use WordPad on Windows) and strip all the <p> & </p> tags (i.e enter "<p>" in the 'find' text field and leave the 'replace' text field blank). This will prevent the converter from inserting four-six lines between images and comments.
PROTIP: While you are doing this, replace <strong> and </strong> with <b> and </b> and replace <em> and </em> with <i> and </i>. The converter I linked to does not recognize the <em> and <strong> tags.
PROTIP: Don't bother changing the font size much. The converter does not recognize those tags either.
PROTIP: I usually wait until after I have converted the text to BBCode to add in the portraits. I find this is less likely to cause weird problems.
Final Steps
Here are some tips and tricks when publishing your LP on the RPGCodex forums. Above all, make sure to create the topic in Codex Playground.
Maybe it is just me, but I like to make a table of contents for LPs. It makes it quicker for readers to find specific updates.
PROTIP: When posting an update, ALWAYS write something in the Subject line. Then, after you have published your update, search the forums for POSTS (not topics) made by you (i.e. enter your username in the "Search for Author" field). When you see the subject line of your recent update (it should be the top result), right-click on the subject, select "Copy Link", go to your initial post, edit it and add the link to your most recent update.
Well, this should help get you started. Play on!
1. Posts per Page
2. Filtering thread replies by User
You can filter threads by user id. EG: Say you're reading this awesome LP but rather than reading everyone's crap, you want to just read the stuff posted by the thread author. Well, simply add &filter=USERID to the url.
In this case, click on the user's profile and you'll see the URL has something like "u=11776" on the end. That's the user id. Take that id and add it to the end of your thread url:
From this: http://www.rpgcodex.net/phpBB/viewtopic.php?t=43820
To this (with &filter=11776): http://www.rpgcodex.net/phpBB/viewtopic ... lter=11776
Note how the thread paginates correctly with the filter. Also note that this works for any thread and with any user (IE: It doesn't have to be the thread's author).
Tutorial: On Making Screenshot-based Let's Plays
Since I have made LPs for ten (and counting) games, I thought I might share some of the tricks I have found. Since I prefer (and have only made) screenshot-based LPs, this is what I will cover. You are on your own for video LPs.
NOTE: I have only used quotation marks to designate file names. You should ignore them unless I say otherwise.
PROTIP: Use your initial post as a table of contents. I also suggest including an image appropriate to the subject matter of your LP.
PROTIP: I also suggest you come up with a title for every update of your LP.
Image Capturing Programs
There are many utilities you can use to take a screenshot of a game. The most basic way to do it is to press PrintScreen and paste the resulting image into MS Paint. Here are my three current favorite programs.
DOSBox
If your game can be run in DOSBox, you can use the built-in screenshot utility. Just press Ctrl+F5 to take a picture. (NOTE: In OSX, press fn+ctrl+F5 to take a picture.)
All the screenshots are saved in the capture directory, which is defined in your dosbox.conf file (which, in OSX, can be called "DOSBox version# Preferences". In Windows XP, this folder is usually located in whatever place you installed DOSBox. In OSX (at least in 10.4), the default location is ~/Library/Preferences/capture. MAJOR CAVEAT: When I used the latest version of DOSBox under Windows 7, it stored my screenshots in a temporary location, and when I rebooted my computer, the files were lost. You should edit the config file to make DOSBox place them in a more permanent location (I place them in My Pictures).
The pictures are named after the executable file DOSBox is currently running followed by an underscore and a three digit number: "program_xxx.png" (more if there are over one thousand screenshots of the same program). NOTE: If there are already screenshots of a program, DOSBox will start with one more than the highest current number; if I am taking screenshots of Ultima IV (whose executable is named ultima.com), and there is already an "ultima_501.png", then the next screenshot will be named "ultima_502.png". The screenshots are saved as PNGs and always have the same resolution as the emulated program, which is usually 320x200.
PROTIP: Since I like to keep organized albums, I add an extra zero to the file names if I know I will have more than one thousand of them. See below for how to do that.
FRAPS
If you (and your game) are using a recent version of Windows, you could try FRAPS. It is mostly used for video-capture, but it can take screenshots as well (the default button is F10, I think, but it can be remapped). The screenshots are, by default, stored in FRAPS' installation directory, but you can change that.
One nice thing about FRAPS is that, if your game is using DirectX 9+, it can display a yellow FPS counter in the corner of the screen that flashes white whenever you take a screenshot. This is helpful when you are taking many sequential screenshots (for example, of dialogue) and want to avoid duplicates.
However, FRAPS is shareware, and the free version can only save images in BMP with the current resolution of the game. Furthermore, the naming scheme for screenshots, which cannot be changed, is "program_name YYYY-MM-DD HH-MM-SS-CS.bmp"; for example, here is the name of a screenshot I took of Oblivion: Oblivion 2009-07-04 17-26-04-06.jpg. Since I prefer my file names to just be a prefix followed by a number, this is a negative. Since many image-hosting sites, such as Photobucket, strip whitespace out of filenames, working with a lot of FRAPS images at once is a PITA. Also, I think FRAPS can only be used when the game is run in full-screen mode.
ZScreen
If your game is a little older (up to DirectX 8) or uses OpenGL (I think), you could try ZScreen. It can save images anywhere (even on a remote FTP server), automatically upload images to several image-hosting sites, capture the full screen, capture a window or a selection of a window, name files with a very customizable schema, save files in several formats, automatically adjust the resolution, and use custom hotkeys. My only problem with ZScreen is that it does not have a way to instantly notify me when I take a screenshot of a game in full-screen mode. I use ZScreen for my ongoing LP of Ultima VII: The Black Gate.
!Quick Screen Capture
I do not know much about !Quick Screen Capture, but Brother None recommended it.
Screenshot Captor
Screenshot Captor was recommended by Zeus. I do not know much about it, but he said it was another option for taking screenshots of games too old for FRAPS.
Image Editors
This section is mostly a listing of programs that can resize/rename multiple files. If you want to edit a specific image, you can always use GIMP, Paint.NET, Picasa, Photoshop, and many others.
IrfanView
IrfanView is a freeware program that supports batch renaming/conversion of images. Before I started using ZScreen for my Ultima Underworld and VII LPs, I would take screenshots with the built-in DOSBox screenshot utility and then use IrfanView to rename them and increase them to 800x600. Irfanview can rename files, change their resolutions, or convert them to different formats. For example, I found character portraits extracted from several games I LPed, but they were stored as 30x30 ICOs; I used IrfanView to convert them to 80x80 PNGs.
I have noticed a few problems. If you tell Irfanview to change an image to a specific resolution, you MUST uncheck the option to preserve aspect ratio. This is why many of my earlier UW1 screenshots are 800x500 instead of 800x600. Furthermore, IrfanView has only a limited ability to modify the file names of input files; it can replace three specific strings (i.e. no regular expressions or escape characters) with three other specific strings. For instance, one can strip all zeroes from filenames by entering "0" in a search field and leaving the corresponding replace field blank. Mostly, IrfanView can only give the output files a completely new name based on a limited naming schema (however, it can certainly leave the name unaltered); for example, using the schema "ultimaiv####" will rename all the selected files ultimaiv0000, ultimaiv0001, and so on (although one can specify any starting number).
Automator
If you are using OSX, you are kinda out of luck. You can use Automator to create a batch renaming script; you should supposedly be able to resize/convert images, but I have not managed to do it under 10.4.
1. Open Automator (it's in Applications).
2. Select "Finder->Ask For Finder Items" and drag it right. To save time, change the "Start At" option to your image capture directory. Check "Allow Multiple Selection".
3. Select "Finder->Copy Finder Items" and drag it right. Change "To" to your desired destination directory.
4. Select "Finder->Rename Finder Items" and drag it to the right. Click on the top list box and go down to "Replace Text". Then type in the prefix of your file names (ex:"ultima_") and replace it with something prettier (ex:"ultimaiv").
5. You can experiment with resizing and conversion options, but, as I said above, I could not get them to work.
Image Hosting Sites
Now that you have taken your screenshots, you need to post them on the web. Here are some options.
Photobucket
I use Photobucket for all my screenshots. This is the only one I have much experience with. You can create a free account that can store 500MB of images and has a monthly bandwidth allotment of 10GB. You can create multiple albums to store screenshots in. The normal uploader will upload 200 screenshots at a time; the buggy, Java-based bulk-uploader can upload 255. You can supposedly modify your uploaded images, but I have not had much success doing it. My only major beef with the service is that I cannot easily rename uploaded files.
ImageShack
I do not know much about ImageShack.
Picasa Web Albums
I do not know much about Picasa Web Albums. I assume it is integrated into the Picasa image editor.
Flickr
I do not know much about Flickr.
Imgur
Imgur was another recommendation by Brother None.
Convenience Utilities
Now that you have taken all your screenshots and posted them on the web, you now only have to write the LP itself. Here are some utilities to help you. Since I am lazy right now, I will largely provide only *nix shellscripts and C source files.
PROTIP: Since you are likely using Windows, I will try to write a few batch files to do some of this stuff later. Until then, you can use Cygwin to get a *nix shell for Windows.
ImagePrinter.sh
The following two examples will help you create a file with the images you want to use in HTML format.
Code:
#!/bin/bash
# This script prints a list of all the files starting with PREFIX in a given LOCATION, formats them into HTML, and appends them to $FILENAME.
LOCATION="/Users/elzair/Pictures/u4pics"
IMGTAG1="<img src=\"http://i561.photobucket.com/albums/ss60/Slithe_album/Ultima4/"		# Replace with the first part of the URL to your images.
IMGTAG2="\" alt=\"\">"
IMGPREFIX="ultimaiv"										# Replace with the prefix of your files.
IMGSUFFIX=".png"										# Replace with the filetype of your files.
FILENAME="/Users/elzair/Pictures/test1.html"							# Replace with the full path of the file you want to create.
touch $FILENAME											# Create the filename if it does not exist.
cd $LOCATION
for i in `ls $IMGPREFIX*$IMGSUFFIX`
	do echo $IMGTAG1$i$IMGTAG2 >> $FILENAME
done
ImagePrinter.c
Code:
/*
 * This program prints out the HTML-formatted URLs for images with a given prefix, suffix and number of digits in a given range.
 */

#include <stdio.h>

int main(int argc, char **argv)
{
	if (argc != 5)
	{
		fprintf(stderr, "Usage: %s prefix filetype start_number end_number\n", argv[0]);
		return 1;
	}
	int i = 0, start = atoi(argv[3]), end = atoi(argv[4]);
	char tagone[] = "<img src=\"http://i561.photobucket.com/albums/ss60/Slithe_album/Ultima7/";	//Replace with the URL to your images.
	char tagtwo[] = "\" alt=\"\">";
	for (i=start; i<=end; i++)
	{
		printf("%s%s%05d.%s%s\n", tagone, argv[1], i, argv[2], tagtwo);
	}
	return 0;
}
Writing the LP
Now, some of you may be happy with your system's default text editor (NotePad, WordPad, TextEdit, Emacs, etc.) After writing many LPs, I began to crave a WYSIWYG editor, so I could simultaneously view the finished product and edit it. You may notice that the images and comments in my earlier Ultima LPs sometimes seem out of synch; this is because I often had to guess which image contained the picture I wanted. I found a few WYSIWYG BBcode editors, but they did not do everything I needed, so I looked around for some WYSIWYG HTML editors.
Amaya
I ended-up using Amaya. It is open-source, cross-platform and does everything I need. The interface is pretty self-explanatory. You can add comments in between images, delete and move around images and so on. The only notable things are that Amaya uses <strong></strong> for bolding and <em></em> for italicizing.
PROTIP: If you are transcribing dialogue and want to use character portraits, try typing the name (in lower case) of the NPC speaking before each dialogue. You can then use your editor's find/replace function to batch convert these names into image tags; however, make sure to check "Match Case" and "Replace Full World Only". Since most names began with a capital letter, you should not have to worry about placing random words with portraits.
PROTIP: SAVE OFTEN!!
I know there are other WYSIWYG HTML editors out there, but I have no knowledge of them.
After you finish writing the LP, you can use the Cool HTML to BBCode Converter to convert your file to BBCode.
PROTIP: If you used Amaya, first open the HTML file in a text editor (use WordPad on Windows) and strip all the <p> & </p> tags (i.e enter "<p>" in the 'find' text field and leave the 'replace' text field blank). This will prevent the converter from inserting four-six lines between images and comments.
PROTIP: While you are doing this, replace <strong> and </strong> with <b> and </b> and replace <em> and </em> with <i> and </i>. The converter I linked to does not recognize the <em> and <strong> tags.
PROTIP: Don't bother changing the font size much. The converter does not recognize those tags either.
PROTIP: I usually wait until after I have converted the text to BBCode to add in the portraits. I find this is less likely to cause weird problems.
Final Steps
Here are some tips and tricks when publishing your LP on the RPGCodex forums. Above all, make sure to create the topic in Codex Playground.
Maybe it is just me, but I like to make a table of contents for LPs. It makes it quicker for readers to find specific updates.
PROTIP: When posting an update, ALWAYS write something in the Subject line. Then, after you have published your update, search the forums for POSTS (not topics) made by you (i.e. enter your username in the "Search for Author" field). When you see the subject line of your recent update (it should be the top result), right-click on the subject, select "Copy Link", go to your initial post, edit it and add the link to your most recent update.
Well, this should help get you started. Play on!


